Inventory Customization Guide
Before starting the automated installation with Ansible, you have to create a so called inventory. An inventory is a file, where the configuration for the Ansible playbook is provided.
Basically, there are two options to create that inventory:
- Use the inventory wizard provided by the CIVITAS/CORE CLI tool.
- Create the inventory manually e.g. based on the
default_inventory.yamlfile
Inventory Wizard
CC CLI is a CLI tool designed to assist with the creation, validation, and management of an inventory file for Ansible-based Civitas/CORE platform deployments. The tool provides features to validate inventory syntax and semantics, run installation playbooks, and offers a wizard to generate a valid inventory file.
Important: On many systems it is necessary to use a Python virtual environment to avoid conflicts with system-managed Python packages.
Create and activate a virtual environment before installing cc-cli:
You can then install the cc_cli via pip as follows:
pip install --extra-index-url https://gitlab.com/api/v4/projects/62227605/packages/pypi/simple cc-cli
Next, run the wizard as follows. The wizard guides you through the process of creating an inventory file by asking questions interactively.
cc_cli wizard
The wizard can be run multiple times on the same inventory file. Existing values are preserved (if not changed by the wizard). Also, the wizard will not remove any comments and structure from your inventory file. After completing the wizard, the generated inventory will be saved as cc_cli_inventory.yml.
You can now validate and execute the playbook using the generated inventory file as follows:
cc_cli validate
cc_cli exec
Alternatively, you can further customize the generated inventory file by editing it manually as described in the following sections.
Manual Inventory Configuration
We provide a default_inventory.yaml as starting point. Create a copy and adjust this with the help of this guide. Many of the options can be left as defined by default. Important values will be specifically highlighted.
This guide is organized from the top of the inventory to the bottom and has the goal to give a complete description for all fields:
- General settings
- The local execution setup
- Variables for the Ansible playbook and tasks
- Email Server
- Kubernetes general settings
- Managed databases
- Operation Stack
- Central Database Cluster
- Access Management Stack
- Context Management
- Geo-data Stack
- Add Ons
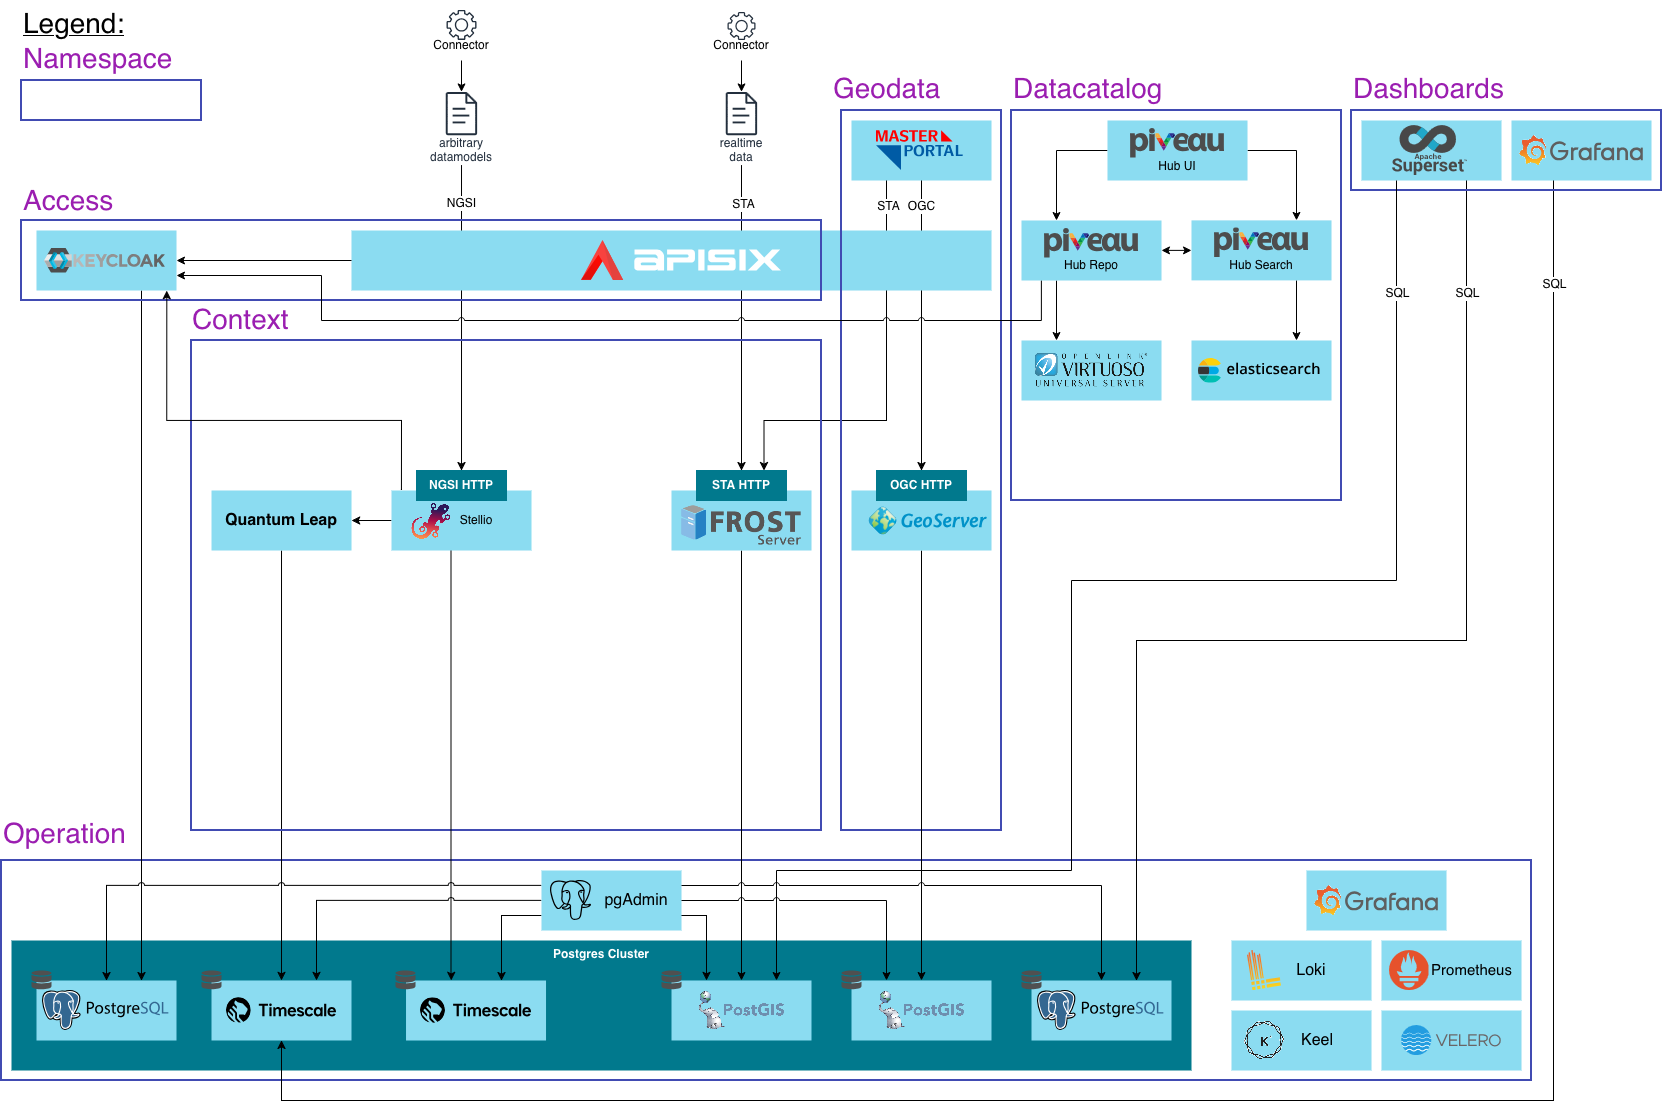
The structure of the inventory file can also be seen in the architecture of the platform.
Inventory Validation
We provide a JSON schema to validate the inventory file. This schema can be used in VSCODE using the YAML extension (extension: redhat.vscode-yaml). To validate the inventory file, open the file in the editor and add the following line to the top of the file:
# yaml-language-server: $schema=https://gitlab.com/civitas-connect/civitas-core/civitas-core-v1/civitas-core/-/raw/main/core_platform/inventory_schema.json
This will enable VSCODE to validate your inventory file. You can also use autocompletion in the editor using CTRL + SPACE or CMD + SPACE.
Multi-Tenant Platform Support
CIVITAS/CORE supports basic multi-tenant management. You can install a shared “base” platform and then onboard multiple tenants on the same cluster. Each tenant corresponds to a separate Keycloak realm and its own set of services, while core components are shared. This is an optional feature – if you continue with a single-tenant deployment, you can ignore the multi-tenant setup.
For those who plan to use multi-tenancy, the deployment process and inventory are structured with new Ansible tags:
- The
baseinstallation (shared components). - Two or more
tenantinstallations (each deploying tenant-specific components and creating a realm in the shared Keycloak). You can start with one tenant installation as well and add more tenants later.
Typically,
- the shared base inventory (or central) will include components like IDM (Keycloak), pgAdmin, PostgreSQL, Kyverno, Keel, monitoring,
- the tenant inventories will include components such as API Gateway (APISIX), pgAdmin, PostgreSQL, FROST Server, Superset and GeoData Stack.
If you intend to leverage multi-tenancy and already have an inventory (existing or created as mentioned above) for deployment of all components at the moment, follow these steps:
-
Split your inventory into a base inventory and one tenant inventory file:
- The base inventory should have
inv_access.keycloak.enable: true(to deploy the shared Keycloak) and common settings. Omit any tenant-specific overrides here. - Each tenant inventory should set
inv_access.keycloak.enable: false(to avoid redeploying Keycloak for each tenant) and include tenant-specific values (see step 3). Important: each tenant need to use its own set of namespaces. Otherwise configuration and payload data of multiple tenants could be overwritten.
Set the
ENVIRONMENTvariable accordingly for base and tenant inventories (e.g.cc-central,cc-tenant1, ...). The installations' Keycloak realms and Kubernetes namespaces will follow the given pattern. - The base inventory should have
-
Optional: if you want to add new tenants to an existing deployment, create new tenant inventories with the properties mentioned in 1.
-
Add the new
tenantsection in each tenant’s inventory. This section defines the initial admin user for that tenant’s realm and whether to use an external IDM:inv_access:tenant:tenant_first_name: "Admin"tenant_surname: "Tenant"tenant_email: "tenantadmin@{{ DOMAIN }}"tenant_username: "tenantadmin@{{ DOMAIN }}"tenant_password: "CHANGE_ME"realm_name: "{{ ENVIRONMENT }}"scope: "openid"enable_events: trueenable_adminEvents: trueThese fields define the tenant realm's admin user credentials (this user will be created in Keycloak for that realm).
In the
inv_access.platformsection of the tenants' inventories, refer to the credentials of the base installation to make sure, tenant users and clients can be created with the central identity management during deployment. (Using theDOMAINvariable here will result in errors, as it points to the tenants rather than the central IDM.)inv_access:platform:admin_first_name: "Admin"admin_surname: "Admin"admin_email: "admin@central.civitas.test"master_username: "admin@central.civitas.test"master_password: "CHANGE_TO_THE_BASE_INSTALLATIONS_ADMIN_PASSWORD"k8s_secret_name: "{{ ENVIRONMENT }}-keycloak-admin"hostname: "https://idm.central.civitas.test"environment: "cc-loc" # the environment name of the multi-tenancy base -
In tenant inventories, ensure
realm_nameis set to a unique realm name for that tenant (by default it can still use{{ ENVIRONMENT }}, but if you run multiple tenants in one cluster, they must each have a distinct realm name). -
Run the Ansible playbook in two stages:
- Base installation:
ansible-playbook -i base_inventory.yml -l localhost core_platform/playbook.yml -t baseThis installs the shared base components (it will set up Keycloak, database operator, etc., but skip tenant-specific ones). - Tenant installation:
ansible-playbook -i tenant1_inventory.yml -l localhost core_platform/playbook.yml -t tenant(repeat for each tenant inventory, e.g., tenant2, tenant3, etc.) This will install the resources for that tenant (e.g., create the tenant’s realm in Keycloak, deploy any dedicated services for the tenant).
- Base installation:
Each tenant will use the base installation’s Keycloak (as a new realm) and shared infrastructure. This approach significantly reduces resource overhead for multiple tenants.
General settings
In the first section, four very important settings are defined.
# (Sub-)Domain for the Installation
# DOMAIN: "staging.example.com"
DOMAIN: "ccp.urban-data.cloud"

# Name of the environment where to deploy to
#   - 'prd' (for production environment)
#   - 'stg' (for staging environment)
#   - 'dev' (for development environment)
ENVIRONMENT: "ccp"

# Name of the kubeconfig file
kubeconfig_file: urban-data-cloud.yaml

## Proxy environment variables
# proxy_state: present
# HTTPS_PROXY: http://squid.internal:3128
# HTTP_PROXY:  http://squid.internal:3128
# NO_PROXY:    10.1.0.0/16,10.152.183.0/24,127.0.0.1
https_proxy: "{{ lookup('env','HTTPS_PROXY') }}"
http_proxy: "{{ lookup('env','HTTP_PROXY') }}"
no_proxy: "{{ lookup('env','NO_PROXY') }}"
The DOMAIN setting defines the (sub-)domain, which points to the cluster's external IP-Address, which in turn must be reachable from the internet. This IP MUST be reachable for this version of the platform, because we use the services of Let's Encrypt to deploy the SSL certificates for the services automatically.
The domain should be configured as a Wildcard A-Record to the IP. If no wildcard is configured, the domain and the respective server names be configured one by one.
The ENVIRONMENT setting defines an identifying prefix for the current deployment. As stated in the comment, it can be used to separate different stages of the same installation. Another usage can be to separate different customer installations in the same cluster.
The kubeconfig_file setting defines the name of the kubeconfig file which is used to connect to the cluster. The file must be located in the ~/.kube directory.
The variables https_proxy, http_proxy and no_proxy define your proxy information. By default, the inventory will use the environment variables HTTPS_PROXY, HTTP_PROXY and NO_PROXY to get the proxy information.
Local execution setup
This part is configured to match the machine, the Ansible-playbook is executed on. If you run it from your local machine, you only need to verify the location of your Python3 binary.
controller:
  hosts:
    localhost:
      ansible_host: 127.0.0.1
      ansible_connection: local
      ansible_python_interpreter: /usr/bin/python3
For example on a UNIX machine the which command will give you this information:
$ which python3
/usr/bin/python3
Email Server
The email server settings define the email server connection for outgoing emails from the platform. These are configured in several platform components.
IMPORTANT: If you need to open firewall settings to allow email sending, you must open port 587.
server: "TODO_PLEASE_SET_A_VALUE"
port: 465
user: "TODO_PLEASE_SET_A_VALUE"
password: "TODO_PLEASE_SET_A_VALUE"
email_from: "TODO_PLEASE_SET_A_VALUE"
The field
email_fromwill be used for components which send emails to users. For example password reset emails from Keycloak.
Kubernetes environment settings
The next section defines the settings for the Kubernetes environment.
## Kubernetes general settings
inv_k8s:
  config:
    context: ""
  gateway_class: traefik
  ### Storage class for k8s PersistentVolumes
  storage_class:
    rwo: ""
    rwx: ""
    loc: ""
  # Gitlab access.
  # Create a token to pull from Gitlab container registry.
  # TODO_PLEASE_SET_A_VALUE IMPORTANT: Only set this if you want to pull from private gitlab repositories.
  # Otherwise, leave it empty.
  gitlab_access:
    user_email: ""
    user: ""
    token: ""

  # Cert Manager settings for letsencrypt
  cert_manager:
    le_email: ""
    issuer_name: ""
    create_letsencrypt_issuer: true
The setting context defines which configured context of the kubeconfig file should be used.
The setting gateway_class defines the gateway class which should be used.
IMPORTANT: The gateway controller must be installed on the cluster.
The storage_class settings define the storage classes which should be used for the specified access modes. rwx is currently not used in the playbook. loc is currently assigned to the database volumes. If your cluster supports local storage provisioning, then you can use this to specify the matching class here, which could provide more performance.
The gitlab_access defines the user and token for the gitlab deployment. The data is used to authenticate the image pull process of some deployments.
The cert_manager defines the settings for the cert-manager. The email is used, when Let's Encrypt needs to contact you for the certificate renewal information. To deactivate the creation of the issuer, set create_letsencrypt_issuer to false.
Common Settings
enable: true
ns_create: true
ns_name: "{{ ENVIRONMENT }}-access-stack"
ns_kubeconfig: "{{ kubeconfig_file }}"
These fields have always the same meaning:
enable: This is a general flag to enable or disable a section of the deployment/configuration.ns_create: This flag tells the script if the k8s-namespace shall be created (set it to false, if you already have namespaces set up).ns_name: The desired k8s-namespace for related components to be deployed. This field defaults to{{ ENVIRONMENT }}-access-stackand can be kept as is in most cases.ns_kubeconfig: The kubeconfig for the specific namespace. This setting is only needed if you have to separate this in your installation. If you have a general kubeconfig for the cluster, you can use{{ kubeconfig_file }}, which refers to the previously defined variable from the cluster-setup.
Managed databases
This section describes the databases that are expected to be existing on the cluster when you want the hoster to provide managed databases. If you do enable the managed databases, the in-cluster-database-deployments (see below) should be deactivated.
The following example shows all required attributes. The structure is the same for all required databases:
- keycloak_postgres
- frost_postgres
- geodata_postgres
- superset_postgres
- superset_upload_postgres
- stellio_postgres
- stellio_subscription_postgres
- quantumleap_postgres
inv_mngd_db:
  enable: "true"
  ns_kubeconfig: "{{ kubeconfig_file }}"
  keycloak_postgres:
    enable: false
    ns_name: "dev-databases"
    db_address: "dev-psql.dev-databases.svc.cluster.local"
    db_name: "keycloak"
    user_k8s_secret: "keycloak.dev-psql.credentials.postgresql.acid.zalan.do"
    admin_k8s_secret: "postgres.dev-psql.credentials.postgresql.acid.zalan.do"
ns_name: The name of the k8s-namespace the secrets are stored for accessing the databases.
db_address: The "path" of the k8s-service pointing to the database.
db_name: The given name of the database inside the Postgres cluster.
user_k8s_secret: The name of the k8s-secret containing the user credentials for database usage.
admin_k8s_secret: The name of the k8s-secret containing the database-admin credentials.
If the databases are provided by a server outside the cluster, the referenced secrets must be deployed before the installation is started.
Operation Stack
The operation stack will be the place, where all management components will live. You can disable components which are provided by your hoster.
inv_op_stack:
  ns_create: true
  ns_name: "{{ ENVIRONMENT }}-operation-stack"
  ns_kubeconfig: "{{ kubeconfig_file }}"
  prometheus:
    enable: false
  postgres_operator:
    enable: false
    ns_name: "{{ ENVIRONMENT }}-operation-stack"
    logical_backup:
      enabled: false
      access_key: ""
      bucket: ""
      endpoint: ""
      region: ""
      secret: ""
      schedule: ""
      retention_time: "" # S3 retention time for stored backups for example "2 week" or "7 days"
  keel_operator:
    enable: false
    ns_name: "{{ ENVIRONMENT }}-operation-stack"
    admin: "admin@{{ DOMAIN }}"
    password: ""
  velero:
    enable: false
    ns_name: "{{ ENVIRONMENT }}-operation-stack"
    velero_namespace_suffix: "backup"
    backup:
      location_name: ""
      access_key: ""
      bucket: ""
      region: ""
      endpoint: ""
      secret: ""
  pgadmin:
    enable: true
    default_email: "admin@{{ DOMAIN }}"
    default_password: ""
    config_enhanced_cookie_protection: true
  monitoring:
    enable: true
    ns_name: "{{ ENVIRONMENT }}-operation-stack"
    prometheus:
      enable: true
      replicas: 1
      storage_size: 20Gi
      retention_days: 14d
    grafana:
      enable: true
      deploy_default_dashboards: true
    alertmanager:
      enable: true
      replicas: 1
      storage_size: 5Gi
      ingress:
        enable: false
    loki:
      enable: true
      deploy_default_dashboards: true
      replicas: 1
      storage_size: 20Gi
      activate_log_retention: true # If set to false, logs will be stored indefinitely
      logs_retention_period: 24h # Should be specified in hours. Minimum is 24h. Is ignored if activate_log_retention is set to false
      gateway_replicas: 1
    alloy:
      enable: true
    private_registry:
      enable: true
      registry_username: ""
      registry_password: ""
      registry_user_email: ""
      registry_url: ""
      registry_full_url: ""
The prometheus section is used to indicate, if prometheus is active in the cluster and the other components should activate metrics endpoints.
The postgres_operator is used to activate the operator itself. If you are on a cluster on your own, the enable setting should be true. On a shared cluster, the operator can only be deployed once. So you have to check if it should be installed or not.
If it is installed, you have to provide S3 Connection parameter in order to use the logical backup feature of the operator.
Later in this file you find a parameter create_logical_backup, which lets you decided if you specifically want to dis-/enable a backup for a database.
Note: The schedule field follows the cronjob notation. In order to create/check your schedule you can use this website: crontab.guru
The keel_operator is used to activate the operator itself. If you are on a cluster on your own, the enable setting should be true. On a shared cluster, the operator can only be deployed once. So you have to check if it should be installed or not.
Additionally you need to set username (which defaults to "admin@{{ DOMAIN }}") and a password, which can be used to access the user interface if needed.
The section velero enables a backup-restore tool which backups complete namespaces. Same as above, you may link it to any S3 storage by adding your information, which will be used to store these backups. The official documentation of Velero can guide you through processes, like restoring a namespace.
The pgadmin section is used to activate PgAdmin in the cluster. Additionally you need to set username (which defaults to "admin@{{ DOMAIN }}") and a password, which can be used to access the user interface if needed.
The monitoring section is used to activate the monitoring stack. If you do not have a monitoring system already in your cluster, you should set the enable option to true, furthermore, you can enable and disable single components of the monitoring stack, depending on what is needed. Grafana is used to display statistics collected form the cluster, if you wish to use them, you should set grafana.enable to true. Under loki.logs_retention_period you can adjust how long logs for each pod in your cluster will be stored.
The private_registry section is used to activate pulling all images only from a private registry. If disable this feature, please make sure to comment out all attributes except enable: false. If you activate this feature, you have to provide the following settings:
registry_username, registry_password and registry_user_email are used to create the image pull secret for accessing the registry.
The registry_url should contain the server name, the registry_full_url should contain the servername followed by the base path to reach the image repositories.
Central Database
The central database is a postgres database for all components using postgres as db backend.
inv_central_db:
  enable: true
  ns_create: true
  ns_name: "{{ ENVIRONMENT }}-database-stack"
  pg_version: "14"
  replicas: 2
  storage_size: 10Gi
  enable_logical_backup: false
Beside the activation and namespace settings, you can define the database version and number of replicas. Also the storage size for each replica can be set.
IMPORTANT: The db cluster uses this storage size per node. So a 3 node DB Cluster will consume 3 x 10GiB = 30GiB of storage, when you set the size to 10 GiB.
With the enable_logical_backup you can decide, if you want to enable logical backups.
Maximum Database Connections
By default, the number of allowed database connections is calculated automatically by the postgres database operator (Spilo) based on the pod's memory limit. With the default limit of 3200Mi this results in approximately 100-120 connections. Increasing the memory allows for more connections. Memory can be adjusted as follows:
inv_central_db:
  resources:
    requests:
      cpu: 35m
      memory: 1500Mi
    limits:
      cpu: 500m
      memory: 3200Mi
To override the connection limit explicitly, set max_connections:
inv_central_db:
  max_connections: 200
Keep in mind that the number of connections scale with memory. Meaning if you want to double to number of connections, you will also have to double the memory.
If max_connections is left unset (the default), the automatic calculation based on the memory limit applies.
Access Management Stack
The access management section configures the identity and api management.
IMPORTANT: You need to carefully set your master_password in the "IDM Users" section here , as well as admin_role and viewer_role for apisix, and jwt_secret and password for dashboard.
- Attention: The
master_passwordrequires at least one special character
## Access management stack
inv_access:
  enable: true
  # When enabled, the base_domain should be "https://idm.{{ DOMAIN }}"
  # Else specify your external IDM Domain
  base_domain: "https://idm.{{ DOMAIN }}"

  ns_create: true
  ns_name: "{{ ENVIRONMENT }}-access-stack"
  # If this works, the code can be simplified
  db_ns_name: "{{ ENVIRONMENT }}-access-stack"
  ns_kubeconfig: "{{ kubeconfig_file }}"
  open_data_dataspace: ds_open_data
  additional_dataspaces: []

  ## IDM Users
  platform:
    admin_first_name: "Admin"
    admin_surname: "Admin"
    admin_email: "admin@{{ DOMAIN }}"
    master_username: "admin@{{ DOMAIN }}"
    master_password: ""
  ## IDM General Values
  keycloak:
    enable: true
    realm_name: "{{ ENVIRONMENT }}"
    k8s_secret_name: "{{ ENVIRONMENT }}-keycloak-admin"
    scope: "openid"
    enable_events: true
    enable_adminEvents: true
    log_level: "INFO"
    replicas: 1
    theme: "keycloak" # Use "keycloak" for basic theme or your custom theme name
    enable_logical_backup: false
  database:
    enable: false
    central: true
    replicas: 1
  apisix:
    enable: true
    ns_create: true
    replicas: 1
    ns_name: "{{ ENVIRONMENT }}-access-stack"
    ns_kubeconfig: "{{ kubeconfig_file }}"
    enableIPv6: true
    # Some users experience problems when these keys contain special characters.
    # We recommend to choose sufficiently long keys without special characters.
    api_credentials:
      admin_role: ""
      viewer_role: ""
    dashboard:
      jwt_secret: "" #openssl rand -base64 12
      admin:
        username: "admin@{{ DOMAIN }}"
        password: ""
    etcd:
      replicas: 1
      volumePermissons: false
    stream: # enable for MQTT Integration
      enable: true
      mqtt_service_type: "LoadBalancer" # "ClusterIP", "NodePort" or "LoadBalancer"
      mqtt_service_port: 1883
      mqtt_service_sni: "mqtt.{{ DOMAIN }}"
      enable_tls_for_mqtt: true # See Inventory Guide for additional instructions
      dns01_wait_minutes: 5
  apis:
    import: true
In cases where you do not want to deploy APISix, you can disable it. If APISix is disabled, you must also ensure that the API registration is disabled to avoid errors during the playbook execution.
- To disable APISix, set
apisix.enabletofalse. - To disable the API registration, set
apis.importtofalse.
If you have an external instance of APISix or another API management solution already in place, you can set apisix.enable: false but still deploy the APIs by setting apis.import: true.
The attribute open_data_dataspace configures the name of the open data dataspace of the platform. This is used to enable public access to data. This dataspace will be created automatically in Frost and Stellio. In addition, the attribute additional_dataspaces can be used to add further dataspaces. These will be created as private dataspaces.
The platform section defines the general admin user for the platform, as well as the configuration of Keycloak itself.
The password restrictions for Keycloak are configured with orientation to BSI recommendation. (Length 12 with at least 1 Uppercase, 1 lowercase, 2 special characters, 1 digit)
The keycloak section describes the realm configuration. The field idm-secret-name defines the k8s-secret which is used to store the admin credentials.
Additionally, it is possible to enable basic and admin events, which can for instance log certain login events or show an audit of the resource creation. More can be found in the Auditing section of the official documentation
It is possible to customize the visuals of Keycloak using themes. In order to persistently deploy a theme, you need to provide a link to an extension containing this theme in the field
theme_url. If you want to create a theme, the official documentation is a good starting point.
The field default_tenant_name is used for the Stellio and acts as fiware-service. It is used to define data spaces on the platform. Give it any name suitable for your first data space.
The database section allows to switch between using the central database or an own instance of a postgres cluster, individually for keycloak. The replica attribute defines the number of replicas for the own database, if used.
The apisix section allows to enable or disable the API Management. The two replicas attributes allow to control how many gateway or etcd instances are created.
Additionally the section of api_credentials defines tokes for the apisix management APIs. Some users experience problems when these keys contain special characters. We recommend to choose sufficiently long keys without special characters.
The section of api_dashboard defines the credentials and the jwt secret for the dashboard.
In the inventory the stream section allows the following parameters to be configured.
mqtt_service_type determines the type how the service is connected to the internet. Options are the standard service type options of The installation is designed to run on a more or less vanilla Kubernetes services: ClusterIP, NodePort, LoadBalancer. The default is LoadBalancer.
mqtt_service_port sets the public port of the service. The default is 1883 (Standard MQTT).
For using TLS with MQTT the next two settings have to be set.
mqtt_service_sni sets the host name that must be used in the Certificate for working with TLS. The default is "mqtt.{{ DOMAIN }}".
enable_tls_for_mqtt enables TLS for MQTT. The default is true.
dns01_wait_minutes sets the amount of time the script waits for the DNS Challenge. The default is 5.
With the setting apis the initial configuration of potential APIs in APISIX can be activated. For that, APISIX must be installed on the cluster, which can be done by the deployment playbook. It's also possible to import the APIs into an existing APISIX instance on the cluster. Each component of the platform, which can provide an external api, registers itself for configuration during playbook execution. This setting here defines, if these self-registrations are considered during playbook execution.
Keycloak
Password Policies
The Keycloak password policy can be configured individually by adding the following configuration values or a subset of them to the inventory file.
inv_access:
  keycloak:
    password_policy:
      length: 12
      digits: 1
      lowerCase: 1
      upperCase: 1
      specialChars: 1
      notUsername: true
      forceExpiredPasswordChange: false
      passwordHistory: 5
Brute Force Protection
Brute Force Protection in Keycloak is enabled by default and set to Keycloak's default values. Optionally, these values can be overwritten from the inventory file.
inv_access:
  keycloak:
    brute_force_protection:
      permanentLockout: false
      maxTemporaryLockouts: 0
      bruteForceStrategy: MULTIPLE
      maxFailureWaitSeconds: 900
      minimumQuickLoginWaitSeconds: 60
      waitIncrementSeconds: 60
      quickLoginCheckMilliSeconds: 1000
      maxDeltaTimeSeconds: 43200
      failureFactor: 30
Theme Customization
A custom Keycloak theme can be deployed as an init container to Keycloak that provides the theme's .jar.
A great starting point for building a custom theme to Keycloak is Keycloakify. It provides everything you need to base your changes on existing theme files and make minimal changes necessary to get to your branding. Once created, bundle your theme as described in the documentation and release it in a minimal container image, such as alpine, that ships the theme's .jar files in /opt/theme.
Finally, configure your inventory to pick up the init container as a theme provider to Keycloak.
inv_access:
  keycloak:
    theme_provider:
      image_registry: registry.gitlab.com
      image_repository: my-keycloak-theme/theme
      image_tag: v1.0.0
Service Portal
The service_portal section allows to enable the service portal. This is a simple web interface which allows the user to manage the access to the platform.
The Service Portal will contain enabled platform components automatically. Extra apps can be added during deployment by adding individual sections as shown below. The role field corresponds to the Keycloak role that is necessary to access an application. It may be left empty.
inv_access:
  service_portal:
    enable: false # Enable the service portal
    ns_create: true
    ns_name: "{{ ENVIRONMENT }}-access-stack"
    ns_kubeconfig: "{{ kubeconfig_file }}"
    replicas: 1
    # Set the pathes to the certificate, the CRL and the CRL in PEM format
    # Only required for self-signed certificates (e.g. for local development)
    # If set, they will be offered for download on the portal page
    certs:
      enable: false
      civitas_crt: "/workspaces/civitas-core/local_deployment/.ssl/civitas.crt"
      civitas_crl: "/workspaces/civitas-core/local_deployment/.ssl/civitas.crl"
      civitas_crl_pem: "/workspaces/civitas-core/local_deployment/.ssl/civitas.crl.pem"
    oidc:
      # If enabled, the user is logged in when accessing the portal
      enable: false
      oidc_authority: "https://idm.{{ DOMAIN }}/auth/realms/{{ ENVIRONMENT }}"
      oidc_client_id: "api-access"
      oidc_admin_role: ""
      oidc_user_role: ""
    apps:
      portainer: false # Enable if you installed a portainer instances, e.g. via local deployment
      extra_apps:
        - id: extra_app_1
          name: Extra Application One
          icon: https://assets.civitas.test/img/extra_app_1.png
          url: https://extra_app_1.civitas.test
          role: ""
          description:
            en: "English description 1"
            de: "Deutsche Beschreibung 1"
        - id: extra_app_1
          name: Extra Application Two
          icon: https://assets.civitas.test/img/extra_app_2.png
          url: https://extra_app_2.civitas.test
          role: ""
          description:
            en: "English description 1"
            de: "Deutsche Beschreibung 1"
Note: Restart the Service Portal pod to make sure the updated ConfigMap is picked up by the container after a deployment.
Context Management
For the context management section we split the documentation a bit. We provide the configuration of three different context management components. All three can be used on their own, so we describe the configuration separately.
SensorThings - FROST-Server
frost:
  enable: true
  ns_create: true
  ns_name: "{{ ENVIRONMENT }}-context-stack"
  ns_kubeconfig: "{{ kubeconfig_file }}"
  db:
    enable: false
    central: true
    enable_logical_backup: false
    pg_version: "14.7"
    replicas: 1
    storage_size: 10Gi
  http:
    replicas: 1
  mqtt:
    enable: true
    replicas: 1
Beside the activation and namespace settings, you can define the database version and number of replicas. Also the storage size for each replica can be set.
IMPORTANT: The db cluster uses this storage size per node. So a 3 node DB Cluster will consume 3 x 10GiB = 30GiB of storage, when you set the size to 10 GiB.
With the enable_logical_backup you can decide, if you want to enable logical backups.
Additionally, you can decide if the mqtt broker of the FROST-Server should be deployed and how many replicas the mqtt broker and http service should have.
NGSI-LD - Stellio Broker
stellio:
  enable: true
  ns_create: true
  ns_name: "{{ ENVIRONMENT }}-context-stack"
  ns_kubeconfig: "{{ kubeconfig_file }}"
  # TODO_PLEASE_SET_A_VALUE IMPORTANT: Only set this if you want to pull the Helm chart from private gitlab repositories.
  # Otherwise, leave it empty.
  helm_credentials:
    username: "" # Gitlab username
    password: "" # Create an access token in Gitlab with read_api
  replicas: 1
  db:
    enable: false
    central: true
    enable_logical_backup: false
    pg_version: "14"
    replicas: 1
    storage_size: 10Gi
quantumleap:
  enable: true
  ns_create: true
  ns_name: "{{ ENVIRONMENT }}-context-stack"
  ns_kubeconfig: "{{ kubeconfig_file }}"
  replicas: 1
  db:
    enable: false
    central: true
    enable_logical_backup: false
    pg_version: "14"
    replicas: 1
    storage_size: 10Gi
Beside the activation and namespace settings, you can define the database version and number of replicas. Also the storage size for each replica can be set.
IMPORTANT: The db cluster uses this storage size per node. So a 3 node DB Cluster will consume 3 x 10GiB = 30GiB of storage, when you set the size to 10 GiB.
With the enable_logical_backup you can decide, if you want to enable logical backups.
Additionally you can decide how many replicas the Stellio broker should have.
If you use a private Helm chart repository, you must specify here the login username and password for the Helm chart repository.
For quantumleap - a component for persisting the time-series data in and additional database, the activation and namespace settings can be defined, you can define the database version and number of replicas. Also the storage size for each replica can be set.
Dashboard Stack
We provide two alternative integrations of Grafana and Apache Superset as dashboard tools. These are described separately below.
Grafana
grafana:
  enable: true
  admin: "admin"
  password: "inW92eOvnEOTE1gGHZTY"
  storage_size: 10Gi
Grafana can be activated with the enable option.
Set username and password (admin, password) for Grafana's internal admin. The credentials are used for api calls within the playbook. The end-user login is done using OIDC.
Additionally, the local storage size for Grafana can be set.
Apache Superset
superset:
  enable: true
  mapbox_api_token: ""
  # Generate once per System with > openssl rand -base64 42
  db_secret: "Gc3bbMK9mtEpQBvki43Ezs0IDLXEMDGA98P1c8cnRcI1QqEN33NQ7x3j"
  admin_user_password: "a94pyJkZLtd2Djm!TTRe"
  admin_user_name: admin
  redis_auth_password: "E*FD4rVJqJ8Mc-ChzWWB"
  replicas: 1
  db:
    enable: false
    central: true
    replicas: 1
    pg_version: "14"
    storage_size: 10Gi
    enable_logical_backup: false
Apache Superset can be activated with the respective enable option.
Optionally, set the mapbox_api_token to activate the Mapbox integration.
Set username and password (admin_user_name, admin_user_password) for Superset's internal admin. The credentials are used for api calls within the playbook. The end-user login is done using OIDC.
Generate an redis_auth_password password, this will be used internally.
In the db section, you can define if the central database should be used. Beside the activation and namespace settings, you can define the database version and number of replicas for an own database instance. Also the storage size for each replica can be set.
IMPORTANT: The db cluster uses this storage size per node. So a 3 node DB Cluster will consume 3 x 10GiB = 30GiB of storage, when you set the size to 10 GiB.
With the enable_logical_backup you can decide, if you want to enable logical backups.
Additionally, you can decide how many replicas the Superset should have.
Role customization
The Superset base roles Admin, Alpha, Gamma and sql_lab come with permission presets. These roles' permissions will reset to the default permissions with every Superset Helm chart installation or upgrade. The Public role, which is also built into Superset, can be configured in one of two ways.
By default, the Public role is empty, so public access must be granted explicitly. Any changes made to this role's permissions will persist beyond Helm installations and upgrades.
Alternatively, the Public role can be synced with an existing role by adding the parameter public_role_like to the inventory. Note that any changes to the role's permissions will now be lost upon upgrades. The role will re-sync with the given existing role. Once custom roles have been created in Superset, the public_role_like attribute can be used to sync with one of the custom roles. However, unlike the Superset base roles which are guaranteed to exist upon deployment, renaming or deleting a custom source role will break the deployment.
inv_da:
  superset:
    public_role_like: "Gamma"
Geostack
The Geostack provides different features, which can be used independently. The feature blocks are describe in the following sections.
Beside the common activation settings, the general settings contain two further aspects:
domain: "{{ DOMAIN }}"
enable_apis: true
With the domain attribute the geostack domain domain names can be adjusted individually. The enable_apis attribute determines if the geostack API should be activated.
External IDM
If an external IDM should be used, the following section has to be configured.
idm_integration:
  use_internal_idm: true
  realm_name: ""
  host: ""
  client: ""
  secret: ""
  public_client: ""
  dataspace_claim: ""
The external IDM integration can be activated with the use_internal_idm option. To activate the external idm, set this to false.
The host attribute must be set to the idm host name. The realm_name has to be set to the idm realm, that should be used.
The attributes client and secret have to be set to the idm client id and secret for a protected client in the idm. This is used for all OIDC configurations except to Masterportal login.
The get the Masterportal login working, you have to specify the public client id in the public_client attribute. This client must not have a client secret configured.
The dataspace_claim attribute has to be set to the matching data space claim in the generated tokes. By default the name "data spaces" is used.
Masterportal configuration
  - enable: true
    instance_name: "default" # Name without spaces
    path: "portal"
    masterportal:
      image_registry: "registry.gitlab.com"
      image_repository: "civitas-connect/civitas-core/civitas-core-v1/geoportal-components/geoportal"
      image_tag: "v1.5.0"
      extra_envs: # optional extra environment variables, can be omitted
        - name: "MY_ENV_VAR"
          value: "SOME_VALUE"
You can deploy as many masterportal instances as you need. Depending on you needs, you can (or should) provide a customized container image per masterportal instance. Each Instance can have the following attributes:
enable: Should the configured instance be enabled?ìnstance_name: This value is used to create an unique and speaking name, to identify the components in the clusterpath: The value is used for the URL of the Instance:https://geoportal.<DOMAIN>/<path>is the pattern, which us used to publish the new instance.- Per instance the source of the docker image can be configured: The
image_registry,image_projectandimage_taghave to be set. The image project is the url to the container image containing the Masterportal in theimage_registry. In the example the link points to the gitlab container registry. Theimage_tagis used to set the specific version of the image. - Optionally, extra environment variables can be specified for each instance using a list of name-/value-dictionaries under
extra_envs.
Own Database
gisdb:
  enable: false
  central: true
  replicas: 1
  storageSize: 10Gi
  enable_logical_backup: false
In the gisdb section, you can define if the central database should be used. Beside the activation and namespace settings, you can define the database version and number of replicas for an own database instance. Also the storage size for each replica can be set.
IMPORTANT: The db cluster uses this storage size per node. So a 3 node DB Cluster will consume 3 x 10GiB = 30GiB of storage, when you set the size to 10 GiB.
With the enable_logical_backup you can decide, if you want to enable logical backups.
Mapfish configuration
mapfish:
  enable: true
  image_registry: "registry.gitlab.com"
  image_repository: "civitas-connect/civitas-core/civitas-core-v1/geoportal-components/mapfish_print"
  image_tag: "v1.6.0"
Mapfish is used to generate pdf versions of the configured content in the Masterportal. It can be enabled or disabled.
For Mapfish the image_project and image_tag have to be set. The image project is the url to the container image containing the Mapfish software and templates. In the example the link points to the gitlab container registry.
The image_tag is used to set the specific version of the image.
GeoServer
geoserver:
  enable: true
  prefix: ""
  geoserverUser: admin
  geoserverPassword: ""
  dataDirSize: 10Gi
  cacheDirSize: 10Gi
  s3access:
    region: ""
    user: ""
    password: ""
    endpoint: ""
  migrateDataDir: true
The GeoServer deployment can be activated or deactivated.
The prefix is used to support multiple helm releases in parallel, if needed.
The geoserverUser and geoserverPassword have to be set to the admin user and password of the GeoServer.
The dataDirSize and cacheDirSize have to be set to the size of the GeoServer data directory and cache directory. The default values are 10GiB.
IMPORTANT: For production use, the dataDirSize should be ok with 10GiB. The cacheDirSize should be increased depending on your needs.
The s3access section has to be set enable authenticated s3 access for large raster files for the GeoServer. The generated alias in the GeoServer is s3://bucket/path.
The migrateDataDir option is there to enable automatic migration of the data directory when updating from Civitas versions below 1.3. It is necessary to migrate the data directory because the storage of data within the Kubernetes volume has been adjusted, which means that the previous data and configurations are located in the wrong folder.
Portal Backend configuration
portal_backend:
  enable: true
  image_registry: "registry.gitlab.com"
  image_repository: "civitas-connect/civitas-core/civitas-core-v1/geoportal-components/geoportal_backend"
  image_tag: "v1.6.0"
The Portal Backend is used to generate role-dependant Masterportal configurations.
For Portal Backend the image_project and image_tag have to be set. The image project is the url to the container image containing the Portal Backend software and configuration. In the example the link points to the gitlab container registry.
The image_tag is used to set the specific version of the image.
S3 storage support for the Portal Backend
Dynamic loading of Masterportal configuration files from an S3 storage can be activated using the portal_backend.s3_backend section of the inventory.
portal_backend:
  s3_backend:
    enable: true
    endpoint: "https://s3.civitast.test"
    access_key_id: "s3_read_user"
    secret_access_key: "some_secret_password_123!"
    bucket_name: "portal-backend"
The configuration files for all Masterportal instances will be read from one bucket in which each instance has its own directory. Structure the bucket to reflect your instances.
my-first-instance-name/
  config.json
  rest-services.json
  services.json
another-instance-name/
  config.json
  rest-services.json
  services.json
Datacatalog Stack
The datacatalog stack adds Piveau components to the platform which complement the ability to manage and investigate metadata catalogs.
inv_datacatalog:
  piveau:
    enable: true
    ns_create: true
    ns_name: "{{ ENVIRONMENT }}-datacatalog-stack"
    ns_kubeconfig: "{{ kubeconfig_file }}"
    create_catalog:
      enable: false
      title: "Default Catalog"
      description: "The default catalog after CIVITAS/CORE deployment"
    hub_repo:
      api_keys:
        - key: "SET_A_SECRET_HERE!"
          resources:
            - "*"
      resources: { }
      extra_envs: [ ]
      virtuoso:
        password: "SET_A_SECRET_HERE!"
        resources: { }
        storage_size: 10Gi
      shadow_virtuoso:
        enabled: false
        password: "SET_A_SECRET_HERE!"
        resources: { }
        storage_size: 10Gi
    hub_search:
      api_key: "SET_A_SECRET_HERE!"
      resources: { }
      extra_envs: [ ]
    elasticsearch:
      replicas: 3
      resources: { }
      extra_envs: [ ]
    hub_ui:
      browser_title: "Datacatalog of My City"
      default_locale: "de"
      # Path to the header logo (absolute or relative to playbook.yml)
      header_logo_path: "templates/datacatalog/piveau-hub-ui/CIVITASCORE_Icon.png"
      # Theming - UI colors
      primary_color: "#00b2e3"
      primary_contrast_color: "#fff"
      highlight_background_color: "#fff8e6"
      highlight_text_color: "#4d3800"
      header_background_color: "#fffff"
      header_text_color: "#1c1e21"
      footer_background_color: "#303846"
      footer_text_color: "#ffffff"
      extra_envs: [ ]
      resources: { }
    openapi:
      logo_path: ""
      favicon_path: ""
      imprint_url: ""
      privacy_url: ""
Piveau can be activated by setting the enable option to true.
Piveau Hub Repo
The hub_repo section provides options to customize the metadata repository and its APIs. Custom api_keys can be defined to grant access for harvesters or other external systems to specific resources.
An API key definition consists of the key itself and a list of resources to be accessible using this key. By setting the resource to a wildcard *, general access to all resources will be granted.
api_keys:
  - key: "I_AM_A_GENERAL_API_KEY"
    resources:
      - "*"
  - key: "I_AM_A_SPECIFIC_API_KEY"
    resources:
      - "catalog-id-1"
      - "catalog-id-2"
If required, additional environment variables can be set for the container, e.g.:
extra_envs:
  - name: "SOME_ENV_VARIABLE"
    value: "some value"
Also the resources for the container are adjustable if required. The following settings are available:
resources:
  requests:
    cpu: 500m
    memory: 500Mi
  limits:
    cpu: 500m
    memory: 500Mi
Virtuoso triplestore
Piveau Hub Repo sets up a Virtuoso Triplestore virtuoso where all metadata is stored and also provides an optional Shadow Virtuoso shadow_virtuoso where hidden content, that must not be accessible through Virtuoso's public API, can be stored.
Set the enabled option to false if you do not require the shadow virtuoso.
Both stores require to set a password for the connection between Piveau Hub Repo and the triplestore.
resources can be adjusted as needed (as described for the hub_repo section above).
IMPORTANT: The password configured for Virtuoso must not be longer than 20 characters. Using a longer password (>20) causes Piveau Hub Repo to forward a 401 Unauthorized error from Virtuoso.
Both Virtuoso instances offer an option to adjust the storage_size of the persistent volume.
The initial size is set to 10Gi and must be adjusted as needed.
Private datasets
IMPORTANT: By default, Piveau does not support "private" datasets. All datasets are publicly accessible with read permissions once they are published.
Datasets stored in "draft" mode are protected by access control and can be used as a workaround to keep a dataset private. When using the draft feature, Piveau recommends enabling the shadow Virtuoso to prevent drafts from being accidentally exposed (e.g. by the SPARQL endpoint of the regular Virtuoso instance). Consider that any available drafts will get lost when changing the setup from/to shadow Virtuoso.
The following access restrictions apply for draft datasets:
- Users with the "operator" role are allowed to manage all catalogs and their datasets including drafts.
- Piveau Hub Repo creates a group with the identical name for each catalog. Users in that group can manage all (draft-)datasets associated with that catalog.
- Accessing the drafts by the REST API is possible by defining an API key with general access (
"*", see sectionhub_repo). This setting allows access to all drafts as well as all catalogs. By using this authentication option a further restriction for the drafts is not possible. If an API key is restricted to a specific resource (e.g. a catalog), access to drafts will be denied in general. - It is also possible to access the REST API by using a bearer token. In that case the rules described above regarding the "operator" role and catalog groups apply when accessing the draft endpoints.
Piveau Hub Search
Piveau Hub Search builds a search index of the data catalogs and data sets stored by Piveau Hub Repo and provides an API to search the data sets.
A single API key api_key, which is used for the connection of Hub Repo to Hub Search, has to be defined.
resources and extra_envs can be adjusted as needed (as described for the hub_repo section above).
Elasticsearch
As backend, Piveau Hub Search requires an elasticsearch (cluster or single node), which is adjustable in the number of replicas (recommended: >=3 for production, 1 for local deployments), resources and extra_envs.
Piveau Hub UI
hub_ui provides a vanilla UI to manage and search the data catalog.
You might want to adapt the displayed title of the UI and the default language setting.
The resources and extra_envs can be adjusted as needed (as described for the hub_repo section above).
Additionally the deployment of hub_ui supports theme customization options by setting the path to your own logo (displayed in the header) and adapting the main colors before deploying.
NOTE: If further adjustments are necessary, these can be made by modifying or replacing the
templates/datacatalog/piveau-hub-ui/theme.cssfile before deployment.
OpenAPI settings
Both Piveau Hub Repo and Hub Search expose the OpenAPI specifications of their REST APIs on their base url. These API docs are customizable by means of a few options in the section openapi.
Catalog Creation
A default catalog can be created during deployment using the create_catalog configuration section. If enabled, the catalog has to be given a title and description.
create_catalog:
  enable: true
  title: "Default Catalog"
  description: "The default catalog after CIVITAS/CORE deployment"
Shell
The Piveau Hub UI Shell can be activated using the inventory setting hub_repo.enable_shell. Once enabled, the Piveau Hub UI Shell will be available in the pod on port 5000 as a web UI (http) and for access through telnet on port 5001.
hub_repo:
  enable_shell: true
Set up a port forwarding to port 5000 of the piveau-hub-repo pod and go to http://localhost:5000/shell.html to access the web UI. Within the Vert.x Shell, you can run the installVocabularies command to fetch DCAT-AP vocabularies initially.
Advanced Piveau Configuration
The Piveau components support advanced configuration options using environment variables. Details can be found in the official Piveau documentation, in the README.md file or the default configuration included in each of the Piveau GitLab repositories.
IMPORTANT: Some environment variables may conflict with the predefined variables of the Piveau helm charts. Please verify the resulting configuration carefully.
Addons
inv_addons:
  import: true
  addons: []
To activate addons, clone the addon repository into the addons folder.
Alternatively, you may copy or link the files into the addons folder.
For an addon example, you may copy the files from the addons folder of the civitas_core deployment repository.
After that, activate the addon in your inventory by adding the following snippet to your inventory. Of course, you must adapt the addon name/path.
inv_addons:
  import: true
  addons:
    - "addons/airflow_addon/tasks.yml"
Infrastructure
In this section general Infrastructure customization can be controlled.
Harbor as external registry
  inv_infra:
    harbor:
      enable: true
      username: ""
      password: ""
      debug: false
      base_url: ""
      cron_schedule: "0 0 0 * * */2"
      project_name: ""
This section controls the prefilling of harbor as external registry. username and password are needed to authenticate against the harbor API. debug enables a more detailed output during runtime. The base_url is the hostname incl. protocoll auf the harbor API. The projectname controls the project in which the replication should be saved. The cron_schedule controls how often the replication should be repeated. For more details about this, see the harbor documentation.
Resource Definition
Resource requests and limits for all main containers can be configured via the inventory. For init containers, resource requests and limits can be overridden using Helm value overrides.
Helm Value Overrides
Helm values can be overridden per component using the helm_values property in the inventory.
Example:
inv_access:
  apisix:
    helm_values:
      etcd:
        preUpgradeJob:
          enabled: true
External Secrets File and Ansible Vault
To avoid storing plain-text secrets in the inventory, you can reference values from a separate secrets file and load it during execution.
Secrets files and value references
The cc_cli provides an option to specify a separate secrets file (--secrets-file).
Example secrets file:
cc_secrets:
  master_password: "CHANGE_ME"
Such values can be referenced in the inventory as follows:
inv_access:
  platform:
    master_password: "{{ cc_secrets.master_password }}"
Please note that by convention, the top-level element in that file must be named cc_secrets.
This allows automated checks to verify that the referenced secrets actually exist.
Below the top-level element, you can structure the secrets file as you wish, e.g. by mimicking the inventory structure.
Encrypt, Decrypt and Edit Vault Files
A secrets file can be encrypted using ansible-vault:
ansible-vault encrypt cc_cli_secrets.yml
To decrypt it, run:
ansible-vault decrypt cc_cli_secrets.yml
Further information about encryption, decryption, and in-place editing can be found in the Ansible documentation.
Using secrets files with cc_cli
Run deployment with an explicit (unencrypted) secrets file:
cc_cli exec --secrets-file /path/to/my_secrets.yml
If the secrets file is encrypted with Ansible Vault, ask for the vault password interactively (see security consideration below):
cc_cli exec --ask-vault-password --secrets-file /path/to/my_secrets.yml
Alternatively, use a vault password file:
cc_cli exec --vault-password-file /path/to/.vault_pass.txt
When --ask-vault-password or --vault-password-file is used and --secrets-file is not set, cc_cli automatically uses cc_cli_secrets.yml as a default secrets file.
For automation and reproducible deployments, prefer --vault-password-file over interactive prompting.
See the official Ansible Vault Guide for details.
Security Considerations
Implementation note on --ask-vault-password: The option prompts for a password in cc_cli and writes the password to a temporary file so it can be passed to Ansible as a vault password file.
The temporary file is removed after execution, including normal aborts (for example, Ctrl+C).
If the process is force-killed (i.e. kill -9), cleanup cannot run and a stale temporary password file may remain in /tmp.
This approach is necessary because Ansible Runner may not show an interactive prompt when the option is only forwarded.
Please be aware that, for debugging purposes, the inventory is written to logs in plain text. Even though Ansible Vault enables encryption of sensitive information, that information is decrypted at runtime and may still appear in logs.
Ingress controllers other than Traefik
The platform's default configuration is to create ingresses with Traefik Kubernetes Ingress upon deployment. To use the platform with a different ingress controller, ingress creation can be disabled from the custom inventory. To create gateways for usage with Gateway API upon deployment, enable gateway creation (enable_gateway: true) where ingress creation has been disabled.
inv_op_stack:
  pgadmin:
    enable_ingress: false
inv_access:
  keycloak:
    enable_ingress: false
  apisix:
    enable_controlplane_ingress: false
    enable_dashboard_ingress: false
  service_portal:
    enable_ingress: false
inv_da:
  superset:
    enable_ingress: false
  grafana:
    enable_ingress: false
inv_gd:
  enable_ingress: false
inv_datacatalog:
  piveau:
    hub_repo:
      enable_ingress: false
    hub_search:
      enable_ingress: false
    hub_ui:
      enable_ingress: false
NOTE: For the deployment to run successfully, ingresses must be configured upfront, so that components can be integrated, e.g. with the identity management.
Status
The inventory will change with each additional feature of the platform. Currently we plan to make it easier to configure the platform, be defaulting and removing options from the inventory. So it is important to check this documentation for updates and changes.