Create Mappings in the Mapping Editor
Role: Data Architect, Data Steward
Goal: Transform data from one Data structure into another within a Pipeline.
Required Permissions: Update DatasetDatasetA data-related element that contains processed data and makes it available for consumption. A Dataset is populated via Pipelines and carries Metadata and access permissions.
What you will learn
After completing this guide, you will understand how to:
- configure a Mapping node in a Pipeline
- select Input and Output Data structures
- map Attributes between Data structures
- use transformations and Literals
- convert values between compatible data types
- identify mapped and unmapped output Attributes
What is a Mapping?
A Mapping transforms data from one Data structure into another.
Within a Pipeline, the Mapping defines how values from the Input Data structure are assigned or transformed into the Output Data structure required by the following node.
For example, incoming sensor data from a Data sourceData sourceA data-related element that represents the origin of data. It defines how data is connected, accessed, and ingested into the Platform, such as an external database or sensor network. can be mapped to the structure expected by a Sensor Data storage.
A Mapping can:
- directly assign values from Input to Output Attributes
- convert values between compatible data types
- combine values
- add fixed values
- create geometry values from coordinates
Configure a Mapping node
Mappings are created as part of a Pipeline.
- Open a DatasetDatasetA data-related element that contains processed data and makes it available for consumption. A Dataset is populated via Pipelines and carries Metadata and access permissions.
- Go to Dataflow → Pipelines
- Open a Pipeline in the Pipeline Editor
- Add a Mapping node to the Pipeline
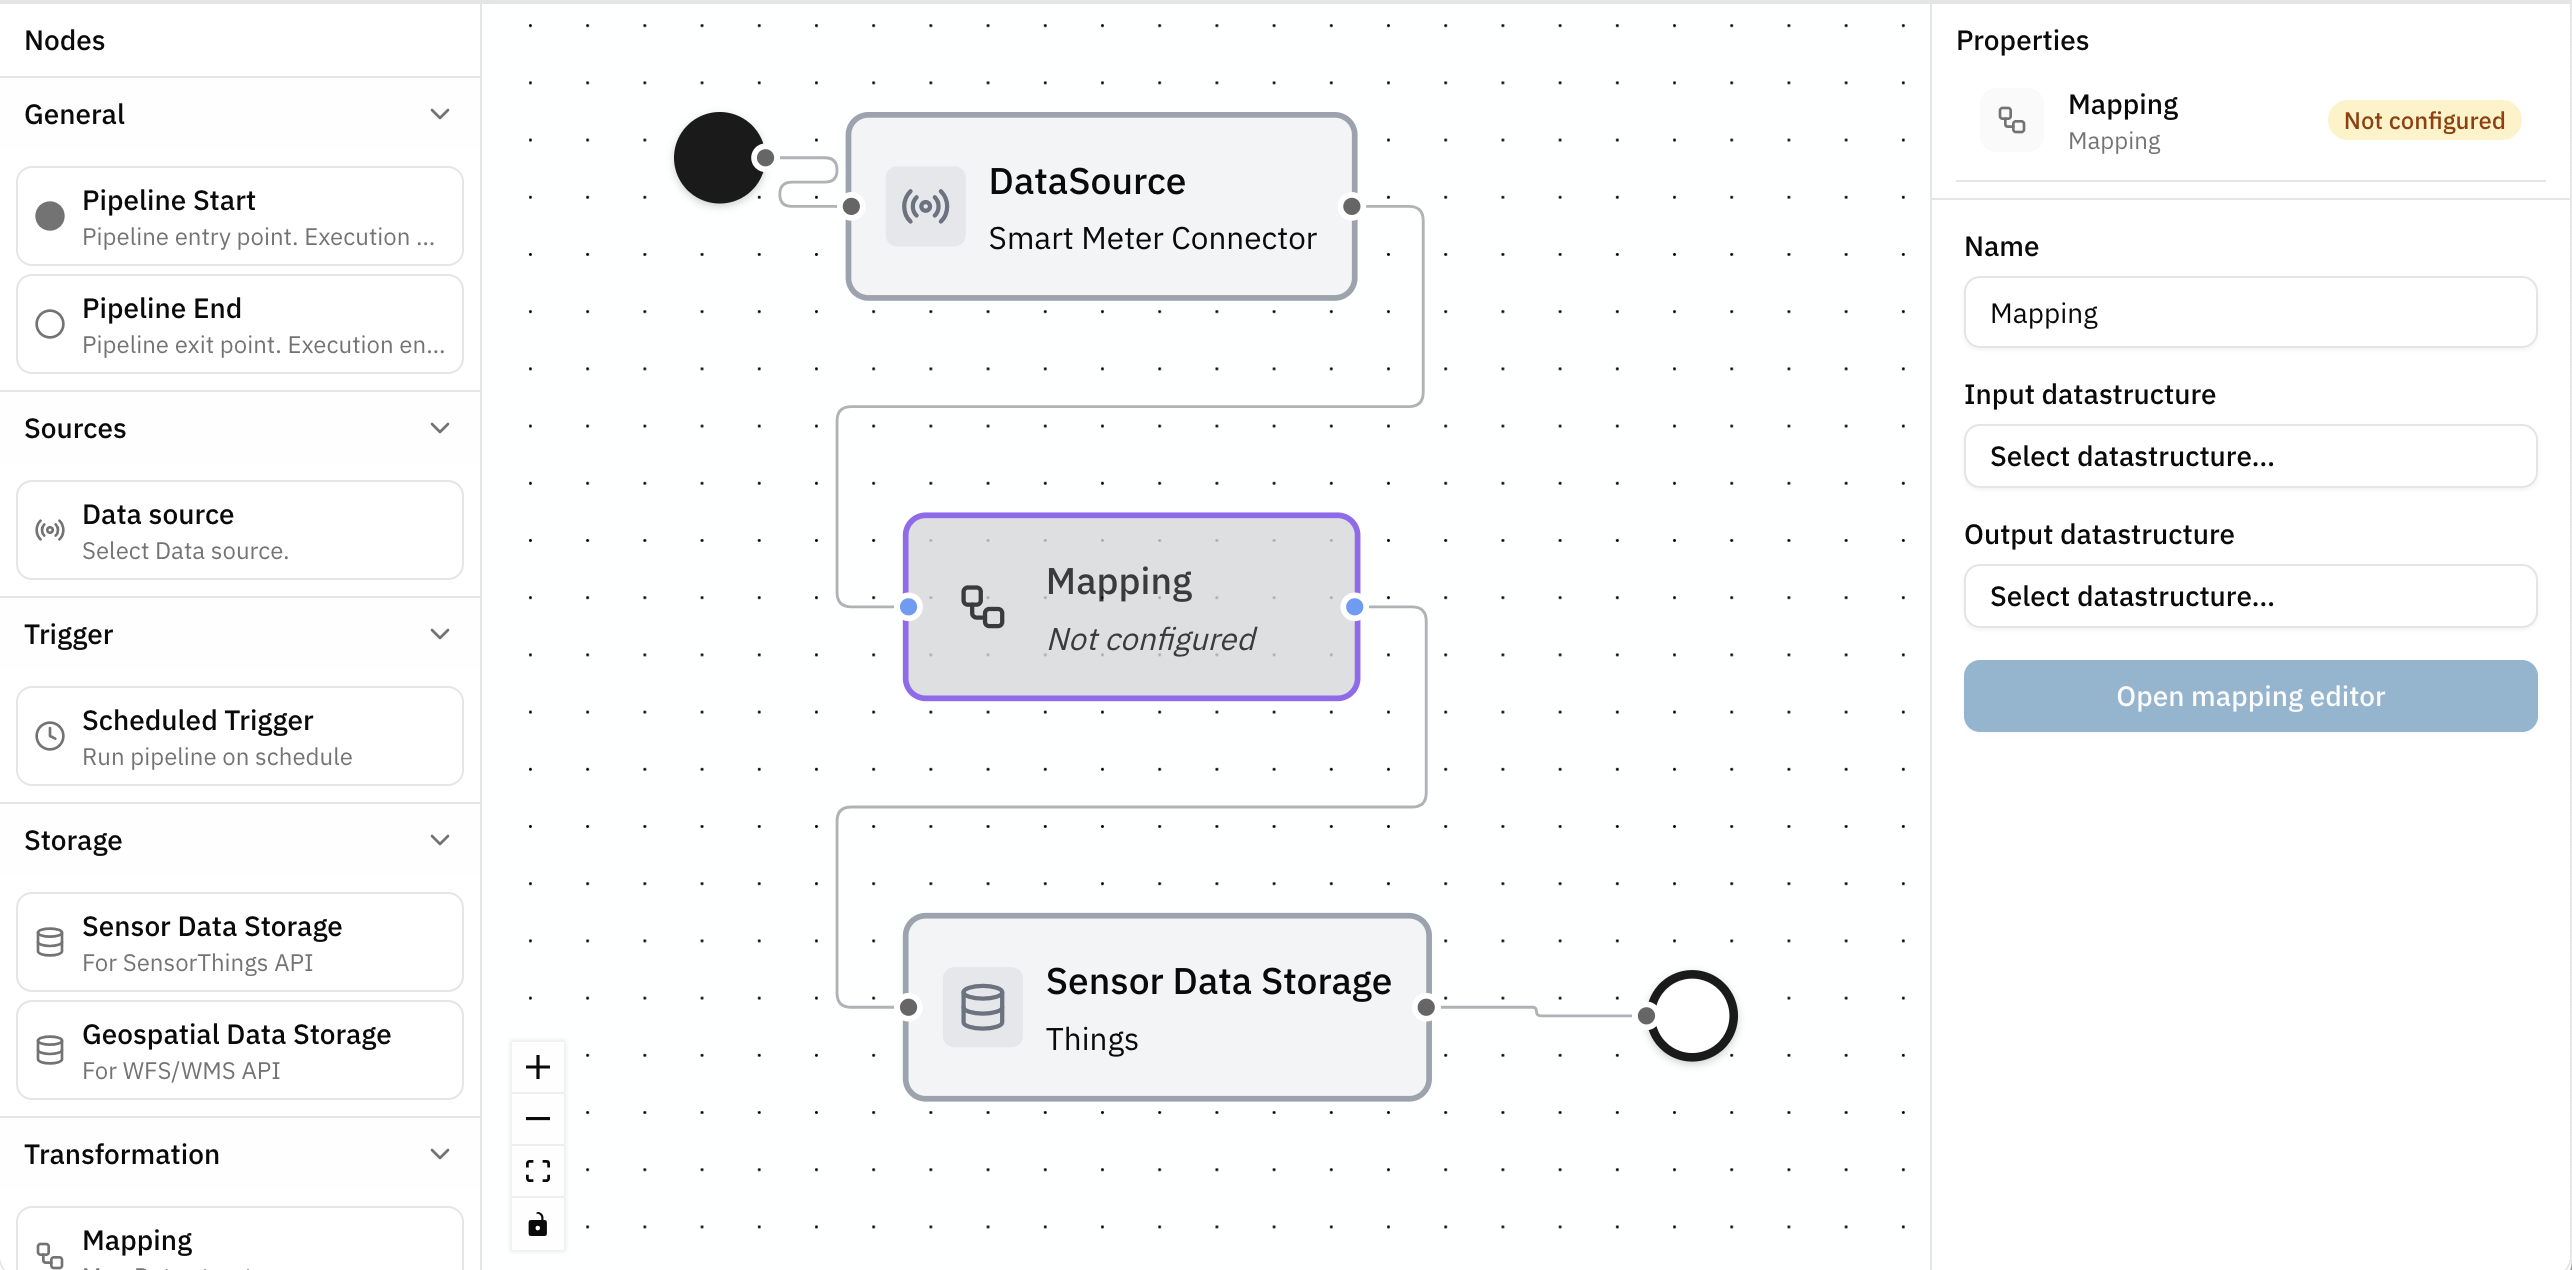
- Select the Mapping node to open its Properties
Define the Mapping
In the Properties panel:
- Enter a Name for the Mapping. The default name is
Mappingand can be changed, for example to distinguish multiple Mapping nodes within the same Pipeline - Select the Input Data structure
- Select the Output Data structure
The Input and Output Data structures should correspond to the data exchanged between the surrounding Pipeline nodes.
For example:
Data source → Mapping → Sensor Data storage
Input Data structure: the Data structure used by the Data sourceData sourceA data-related element that represents the origin of data. It defines how data is connected, accessed, and ingested into the Platform, such as an external database or sensor network.
Output Data structure: the Data structure expected by the Sensor Data storage
Once both Data structures are selected, Open mapping editor becomes available.
Understand the Mapping Editor
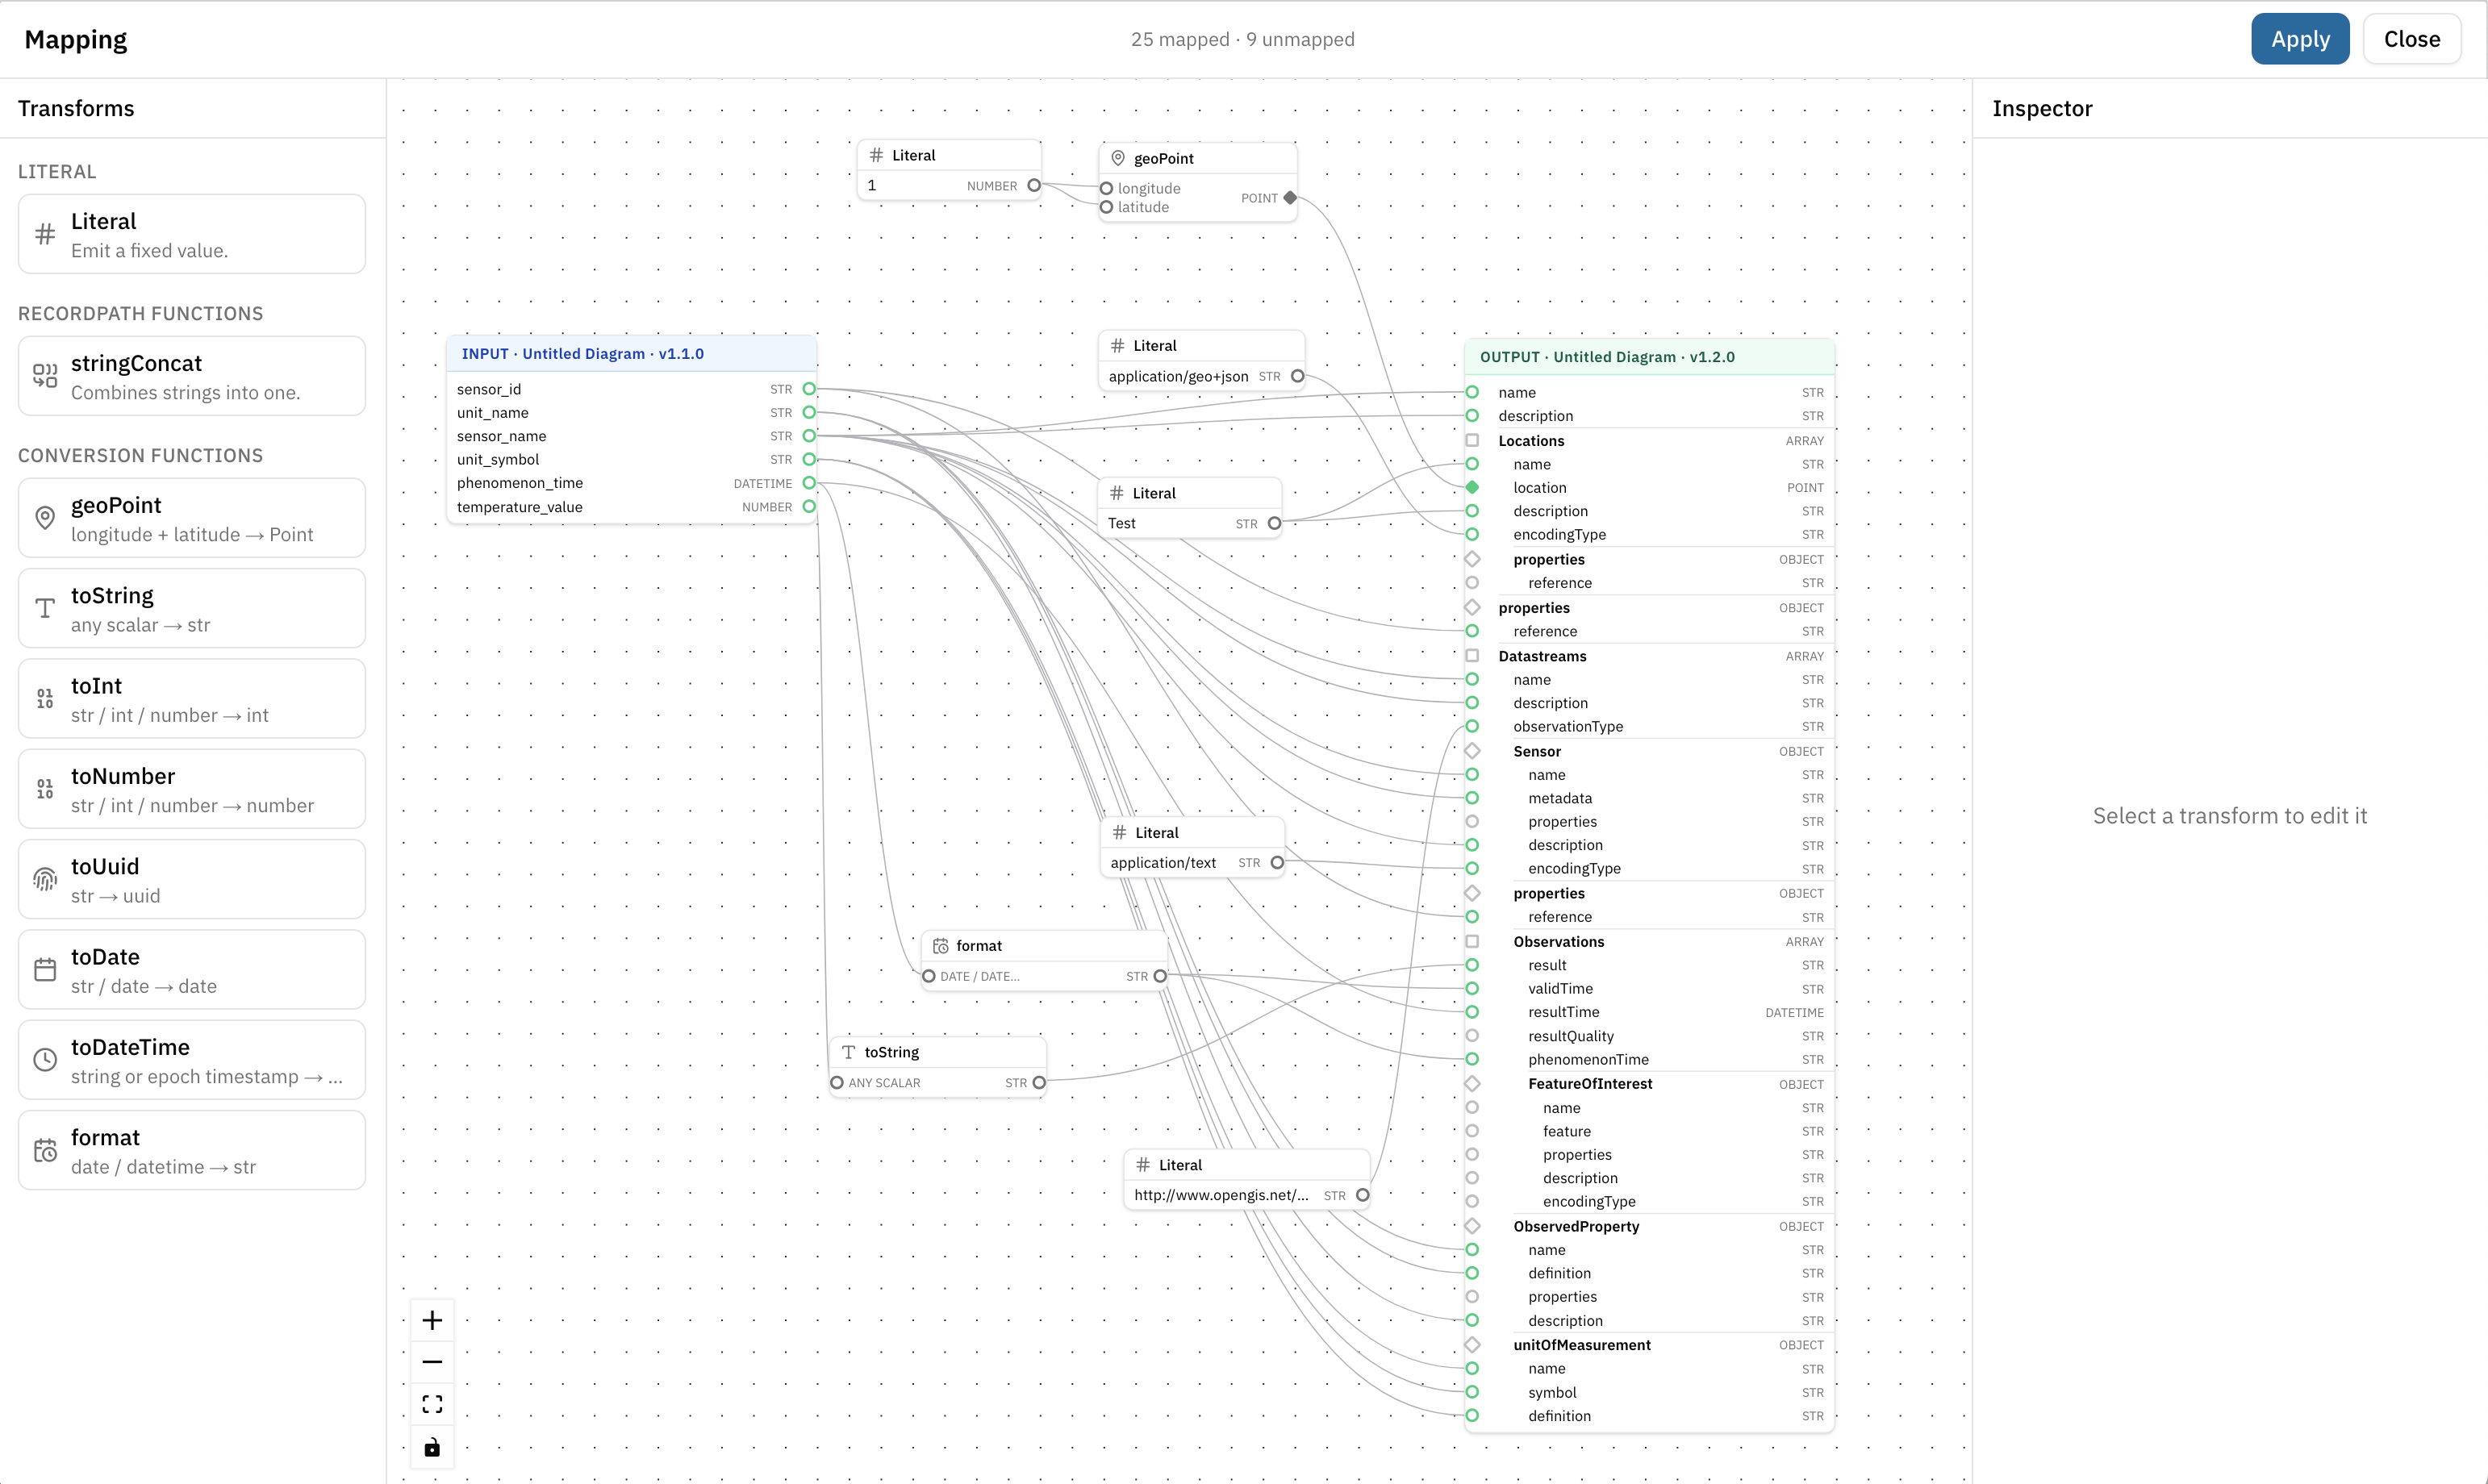
The Mapping Editor displays the selected Data structures and the transformations used to map between them.
- The Input Data structure is displayed on the left side of the canvas
- The Output Data structure is displayed on the right side
- Transforms are available in the left sidebar
- Configuration options for selected transformations are displayed in the Inspector on the right
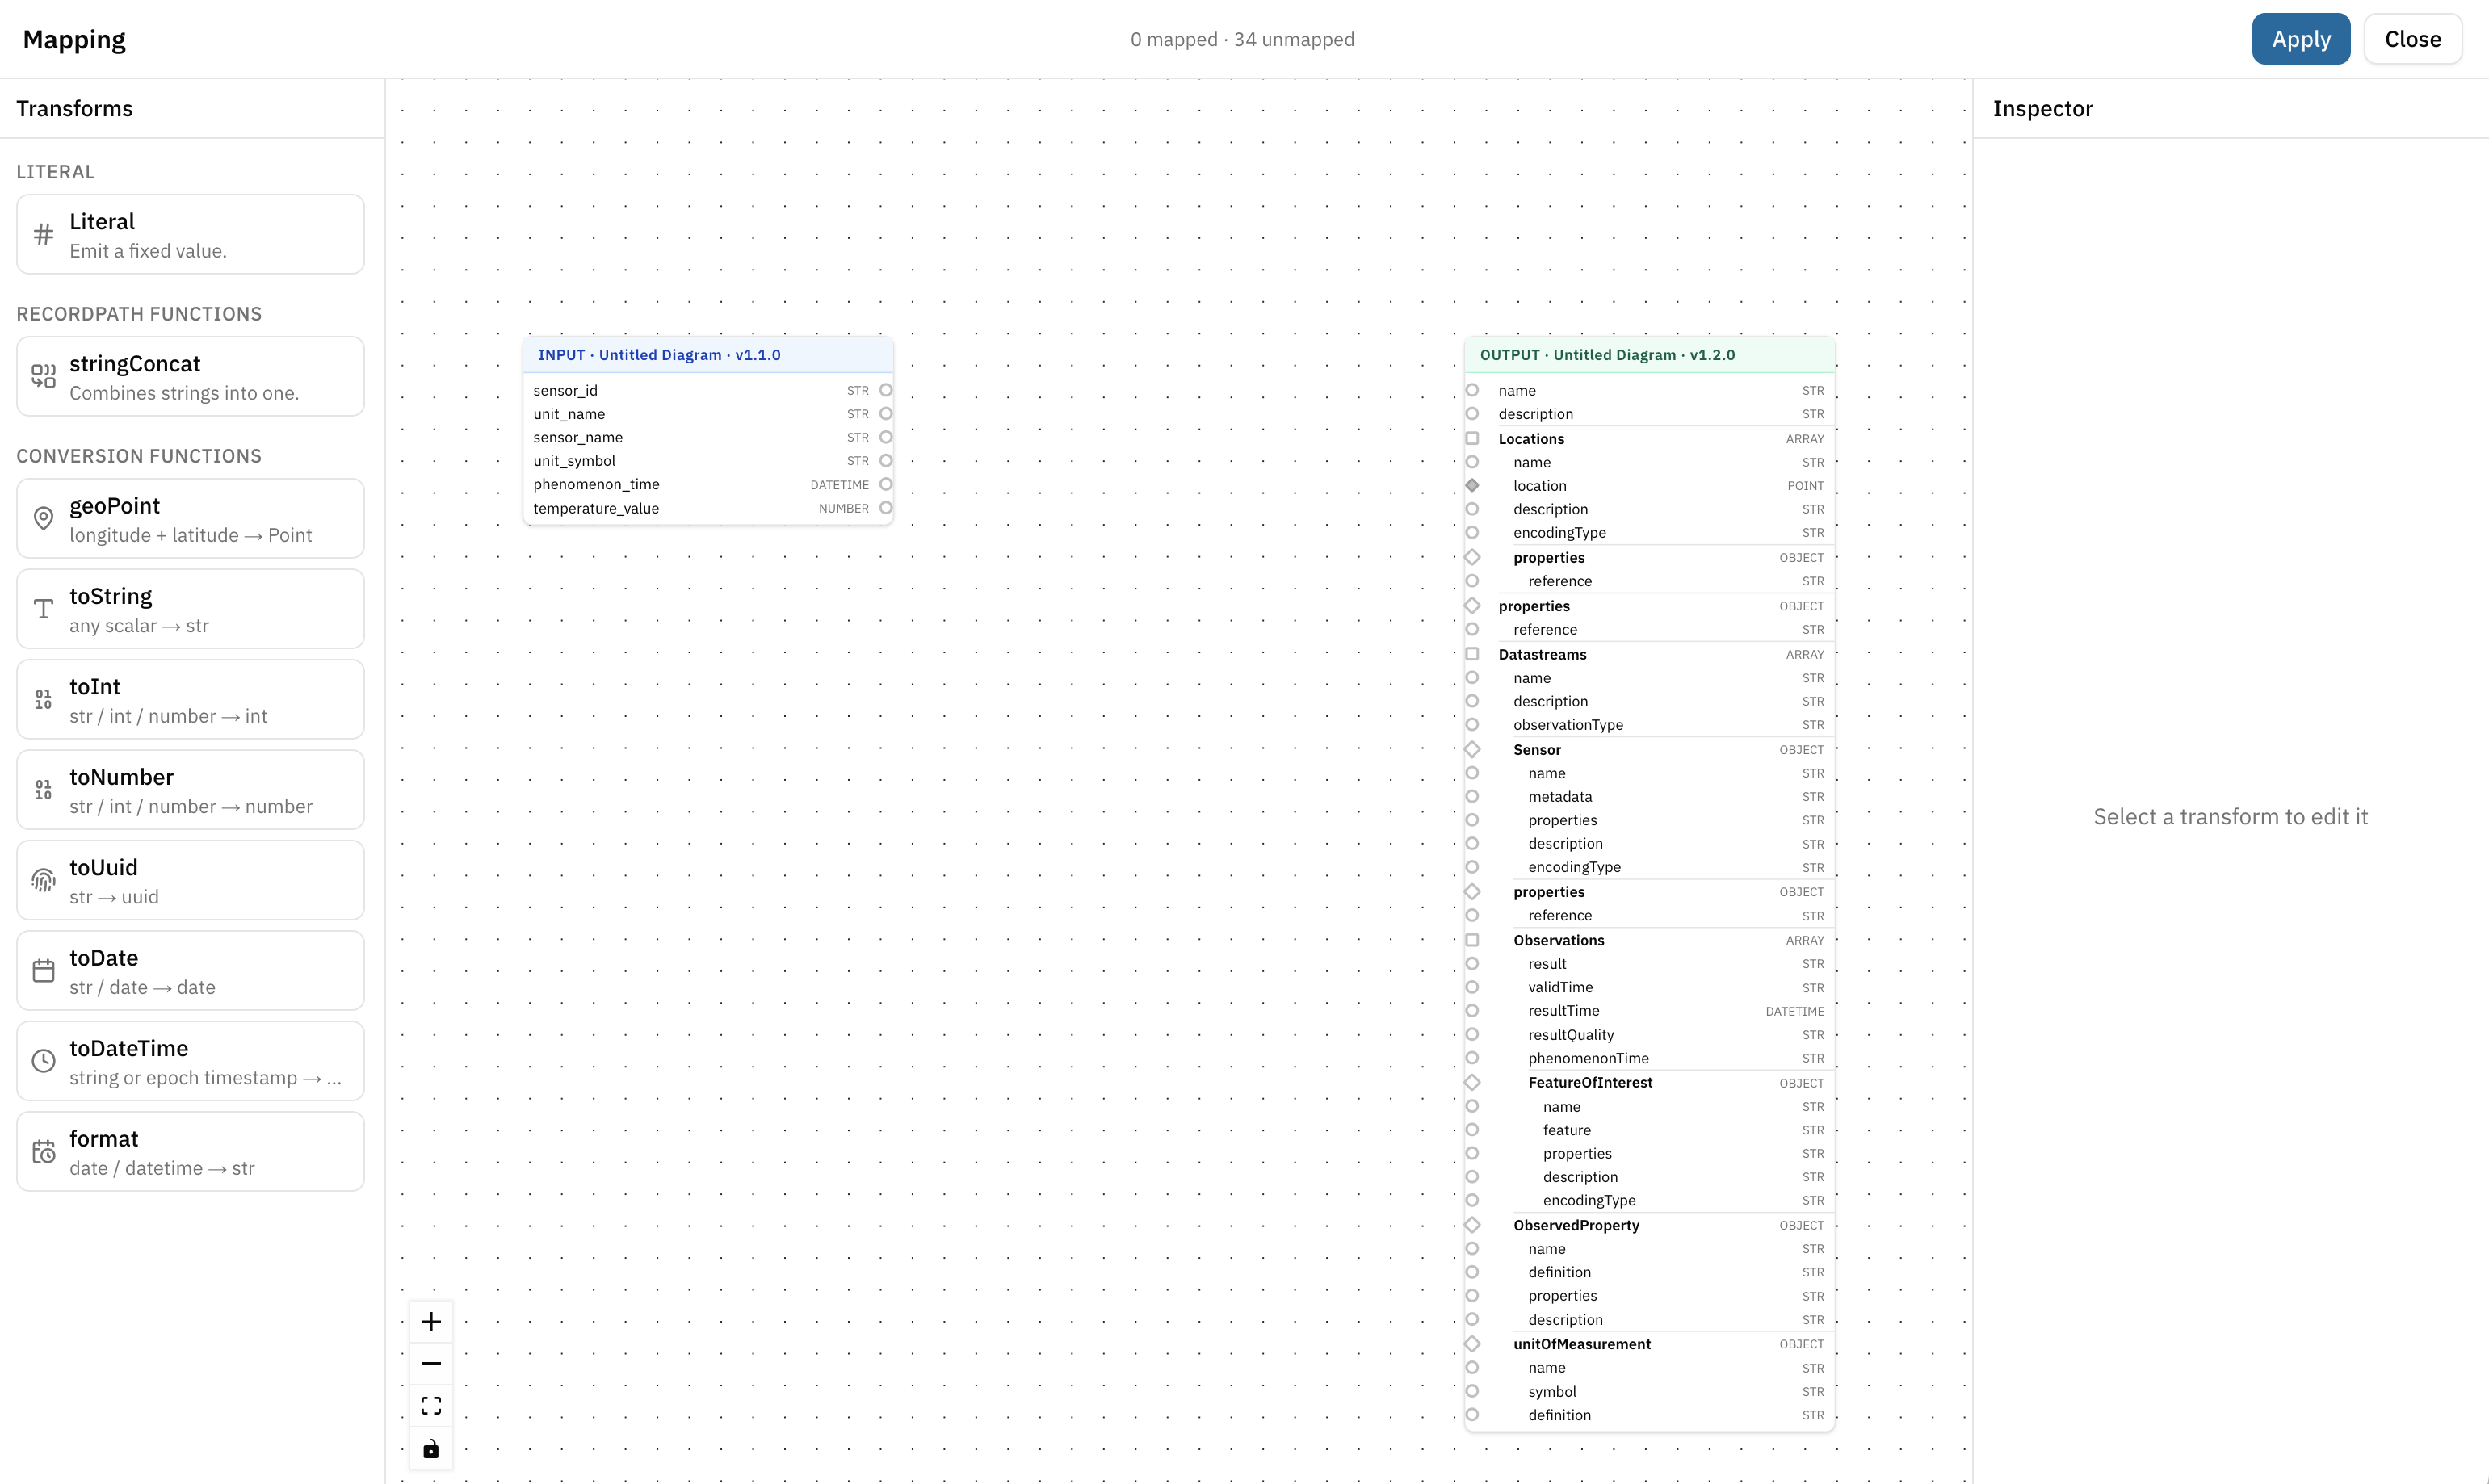
Unlike the Data structure Editor, where Classes and Enums are modeled as individual elements, the Mapping Editor represents each Data structure as a hierarchical structure within a single block.
The hierarchy starts with the Root Class and includes the connected Classes and their Attributes according to the Structure Definition. Understanding the Root Class → Design Data structures with the Data structure Editor.
Map Attributes
To map a value directly:
- Start from an Attribute in the Input Data structure
- Drag a connection from its connection point
- Connect it to a compatible Attribute in the Output Data structure
When starting a connection, compatible target connection points are highlighted.
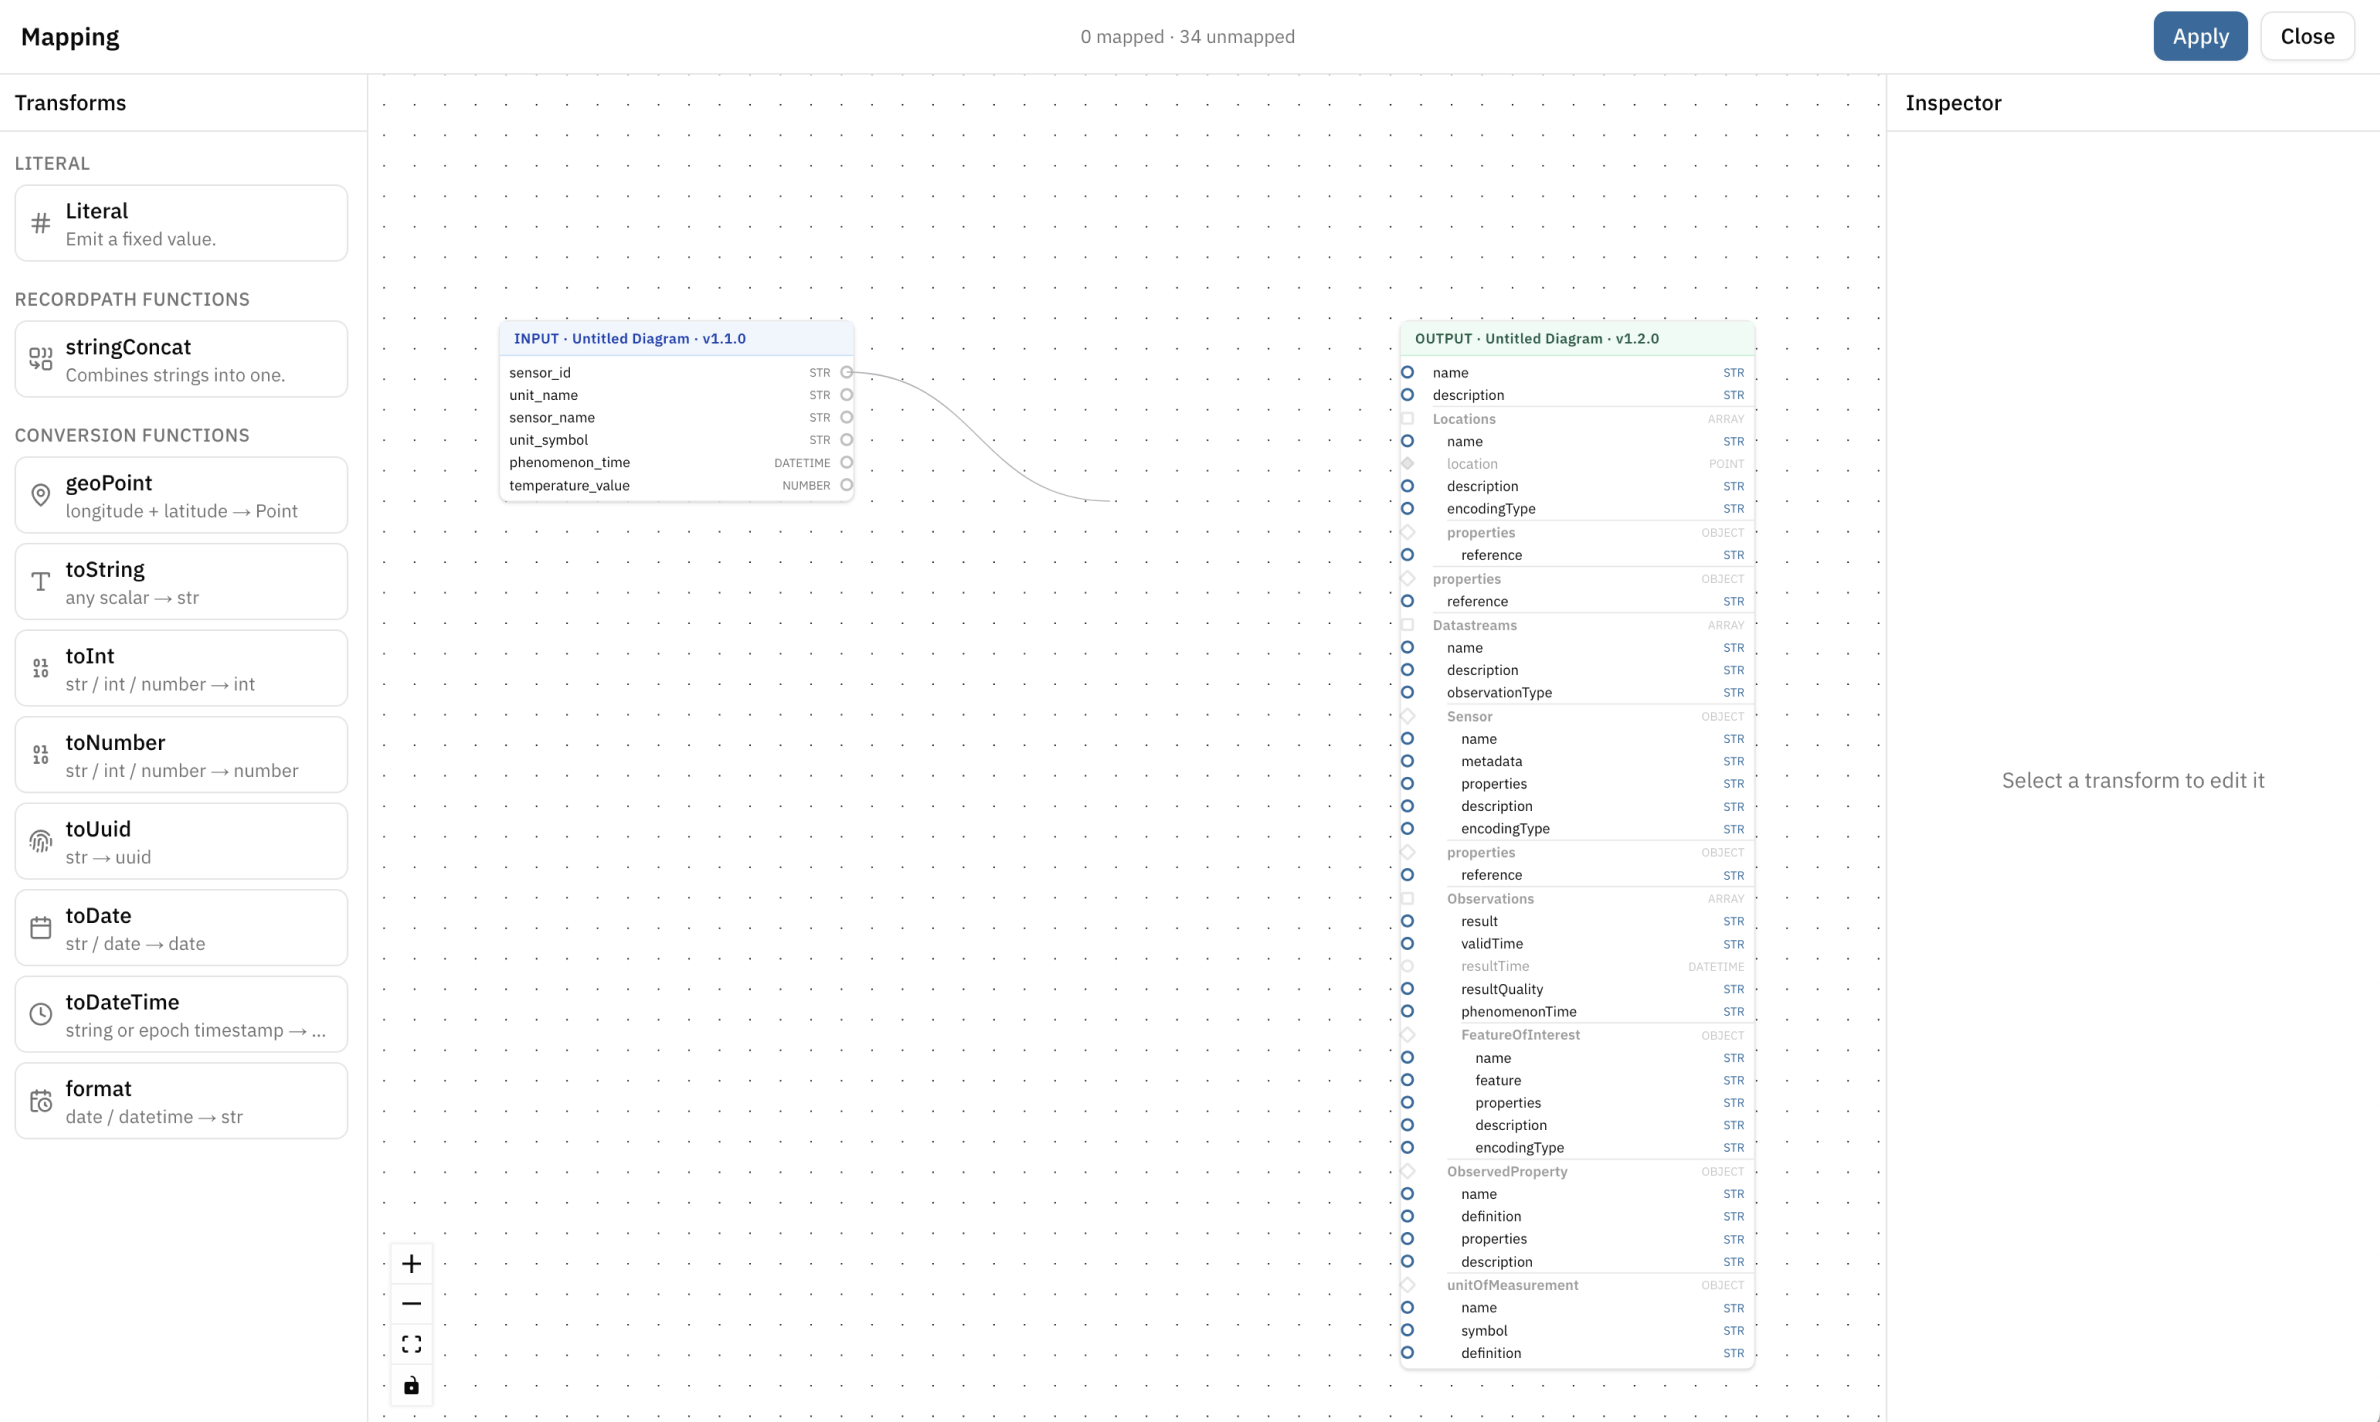
Attributes can only be connected when their data types are compatible. If the Input and Output types are not directly compatible, use a transformation to convert the value before connecting it to the Output Attribute.
The Mapping Editor displays the number of mapped and unmapped Output Attributes at the top of the editor. Use this information to identify Attributes that still require a Mapping.
Transform values
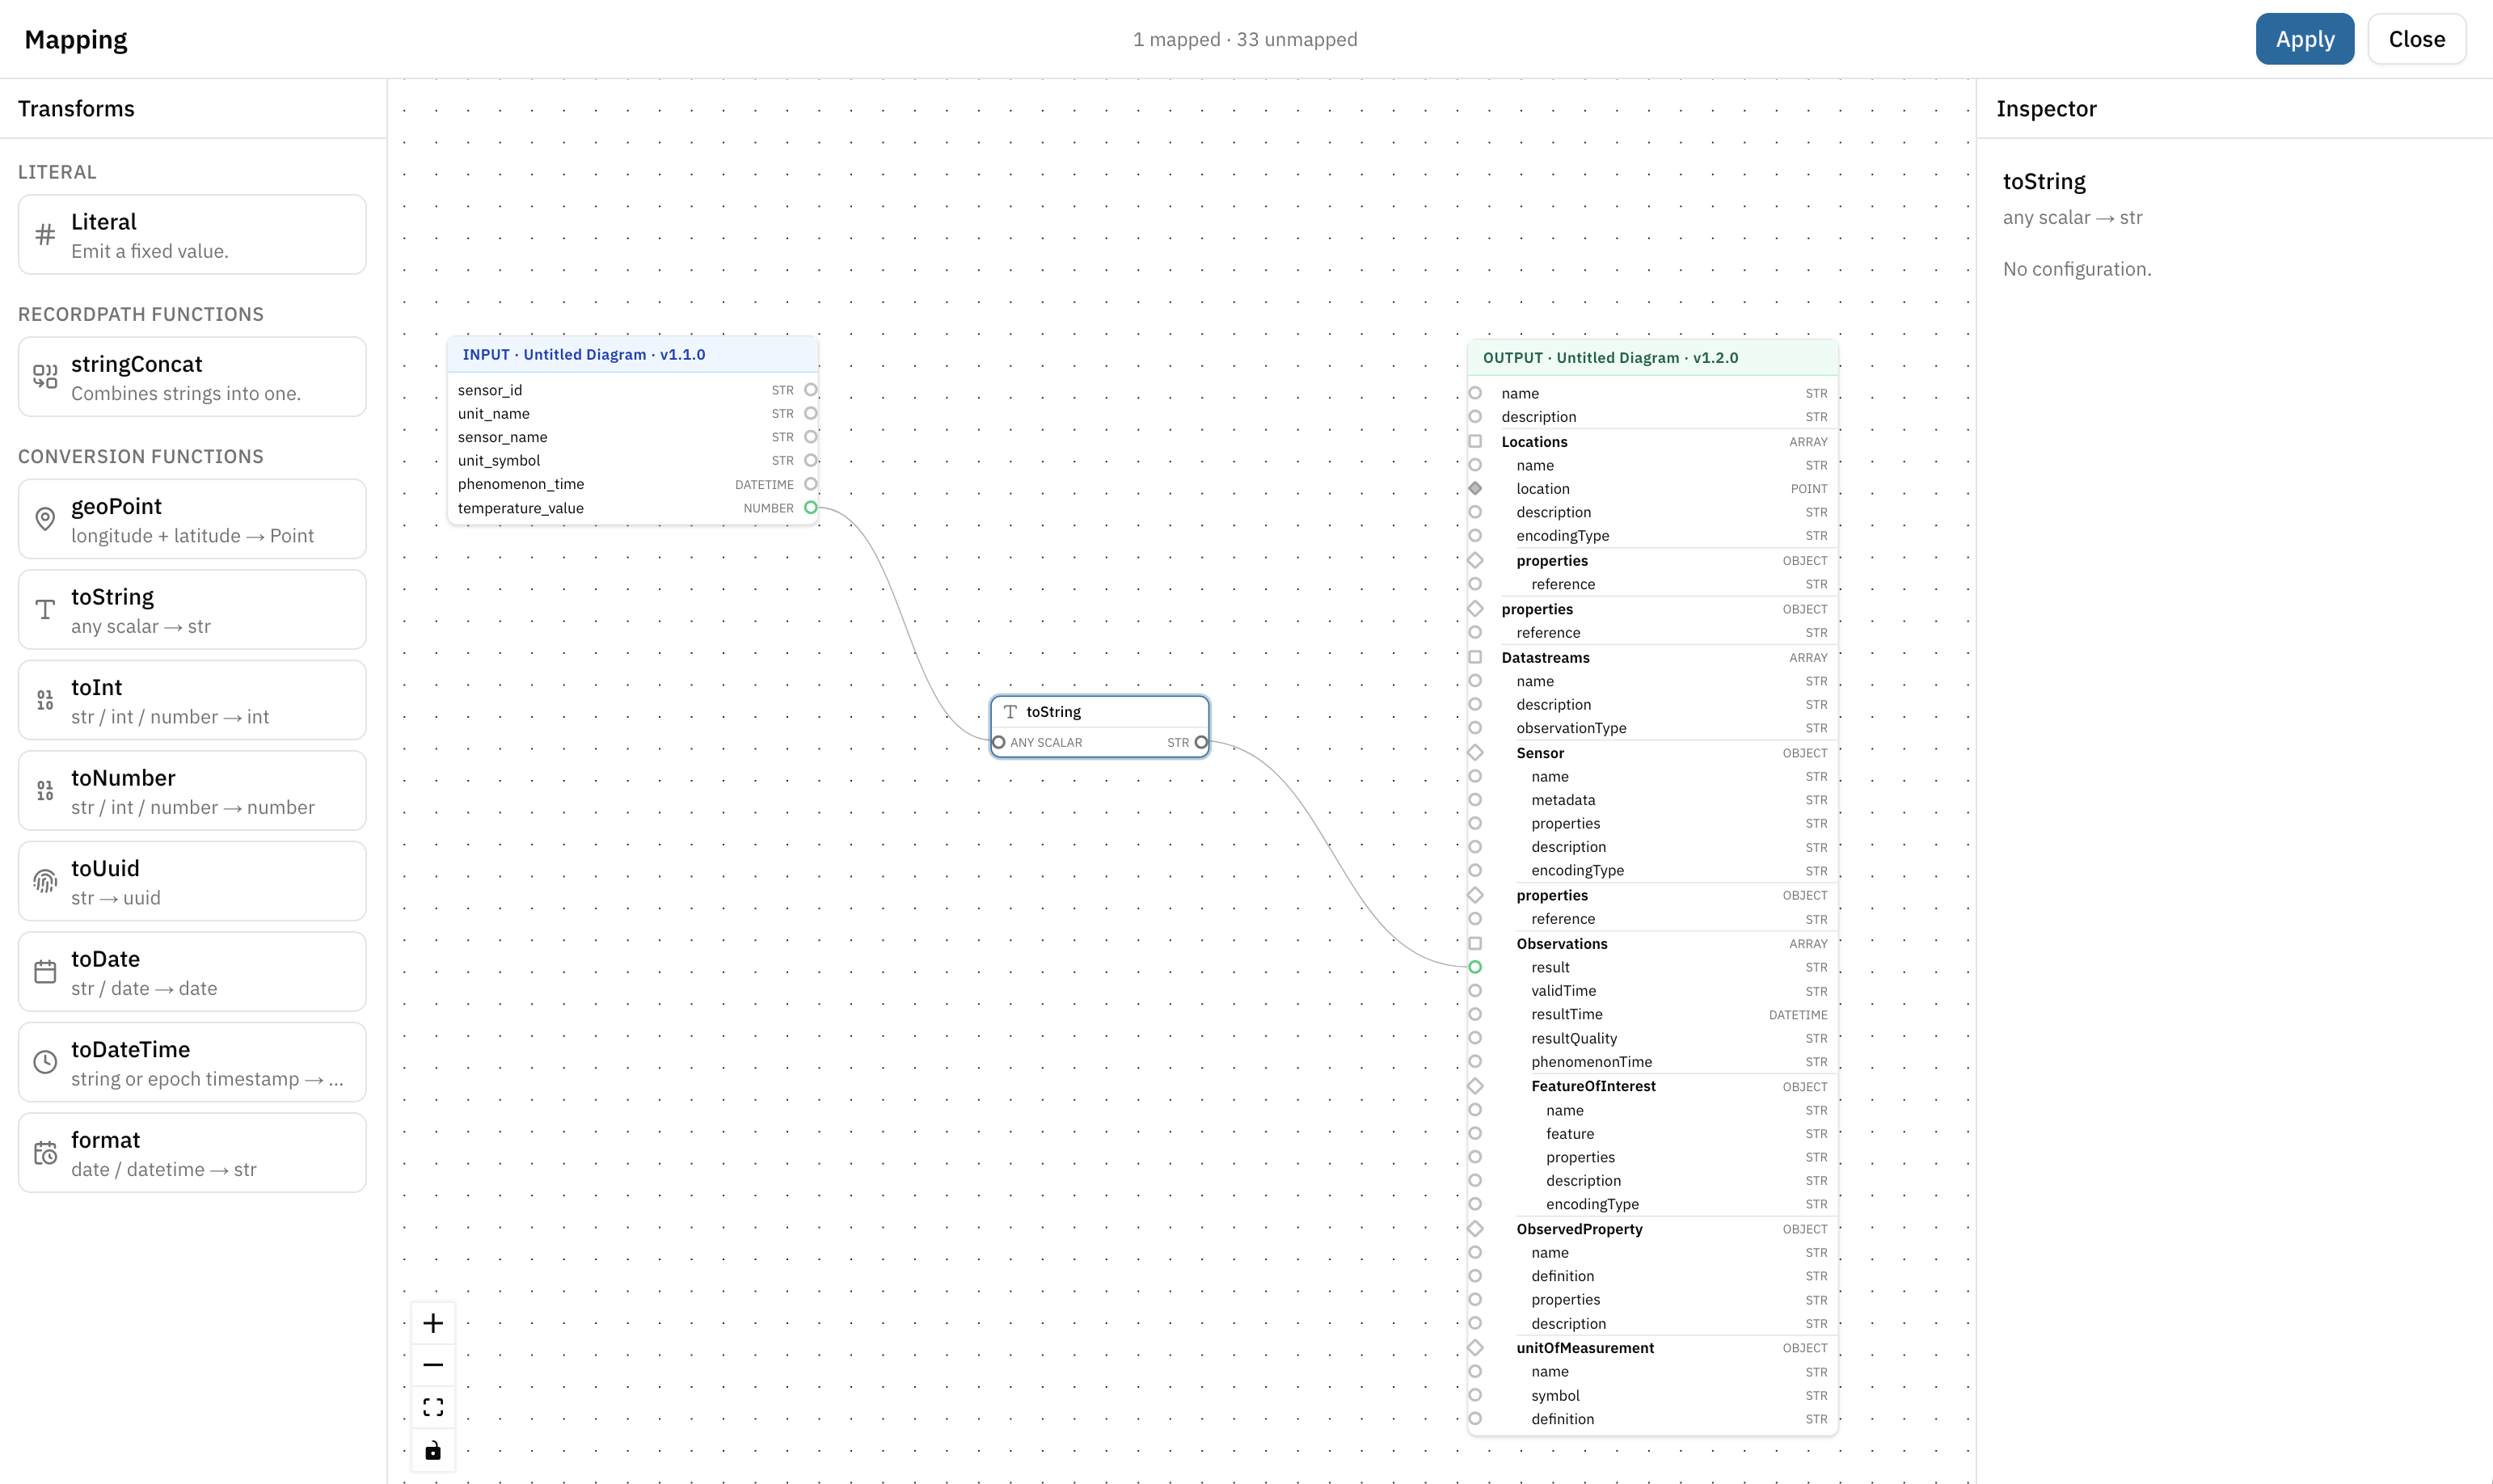
Transforms allow you to modify, convert, combine, or provide values for the Output Data structure. Drag a transform from the Transforms sidebar onto the canvas and connect it as needed.
- Conversion functions transform incoming values before assigning them to Output Attributes
- RecordPath functions combine or process values
- Literals provide fixed values directly to Output Attributes without requiring an Input Attribute
Literal
A Literal provides a fixed value instead of taking the value from an Input Attribute. Connect the Literal's output directly to a compatible Attribute in the Output Data structure.
Select the Literal on the canvas and use the Inspector to define its type and value.
Supported types include:
Primitive types
- String
- Integer
- Boolean
- Number
- Date
- DateTime
- UUID
Geometry types
- Point
- LineString
- Polygon
- MultiPoint
- MultiLineString
- MultiPolygon
- GeometryCollection
Literals are useful when the Output Data structure requires a value that is not provided by the incoming data.
For example, a Literal can assign the fixed value Berlin to a city Attribute when this information is not provided by the Input Data structure.
RecordPath functions
stringConcat combines multiple String values into a single String.
Connect the values to the inputs of the transform. In the Inspector, you can define the separator used between the values.
For example, combine a firstName and lastName Attribute into a full name, using a space as the separator.
Conversion functions
Conversion functions transform a value into another compatible data type.
| Transform | Input | Output | Purpose |
|---|---|---|---|
| geoPoint | longitude + latitude | Point | Creates a Point geometry from coordinates |
| toString | scalar value | String | Converts a scalar value to a String |
| toInt | String / Integer / Number | Integer | Converts a compatible value to an Integer |
| toNumber | String / Integer / Number | Number | Converts a compatible value to a Number |
| toUuid | String | UUID | Converts a String to a UUID |
| toDate | String / Date | Date | Converts a compatible value to a Date |
| toDateTime | String or epoch timestamp | DateTime | Converts a compatible value to a DateTime |
| format | Date / DateTime | String | Formats a Date or DateTime as a String |
Some transformations provide additional configuration in the Inspector.
For example, select format to define the output pattern, such as:
yyyy-MM-dd
Combine transformations
Transforms can also be connected to other transforms.
This allows you to build transformation chains when a value requires multiple processing steps before it can be assigned to an Output Attribute.
For example:
Input Attribute → toNumber → geoPoint → Output Attribute
Apply the Mapping
Once the required Attributes are mapped and transformations are configured, select Apply.
The Mapping is applied to the Mapping node and you can return to the Pipeline Editor. The Mapping node displays the selected Input and Output Data structures and its configuration status.
You can reopen the Mapping Editor at any time while editing the Pipeline to adjust the Mapping.
Summary
You have learned how to:
- configure Input and Output Data structures for a Mapping
- understand how Data structures are represented in the Mapping Editor
- map compatible Attributes directly
- use Literals to provide fixed values
- combine values with stringConcat
- convert values using conversion functions
- create geometry values from coordinates
- identify mapped and unmapped Output Attributes
- apply the Mapping to a Pipeline